ANGLAIS - FRANCAIS
It took some times to have all the picture needed but the tutorial for true metallic is finally here!
De retour pour un nouvel article, on continue dans la série des tutos ceux-ci étant les articles les plus apprécier !
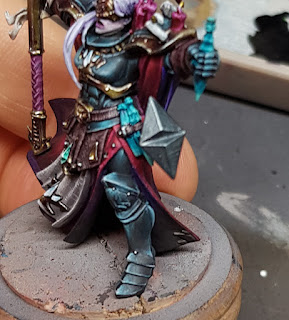
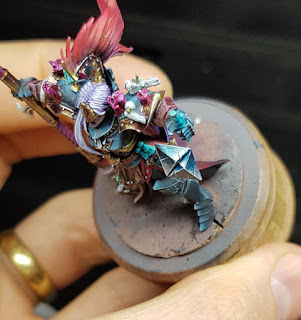
Here a result of this technique applied to the gold and silver.
Voici une idée du résultat de cette technique appliqué ici sur l'or et l'argent.
Voici une idée du résultat de cette technique appliqué ici sur l'or et l'argent.
I know NMM is all the rage now, but I do find a good metallic can be even more challenging due to the way the metallic pigments act. On the other hand, it’s basically NMM with metallic paint so…
Again this is just one way of doing it, with a very strong contrast, feel free to try new colour for fun effect or to dilute the ink if you want a lighter transition.
Je sais qu'en ce moment la tendance est plutôt au NMM, mais je me suis gentiment rendu compte qu’un joli « vrai » métallique peut être tout aussi difficile à rendre correctement, en partie à cause de la nature ces pigments métalliques et le rendu sur une table de jeu est également super sympa.
Encore une fois ce n’est qu’une proposition de rendu avec un contraste très fort, n’hésitez pas à expérimenter ou changer les couleurs, voir à diluer l’encre pour une résultat plus doux.
Encore une fois ce n’est qu’une proposition de rendu avec un contraste très fort, n’hésitez pas à expérimenter ou changer les couleurs, voir à diluer l’encre pour une résultat plus doux.
Without more ramble let’s dig in!
Fini le baratin, rentrons dans le vif du sujet !
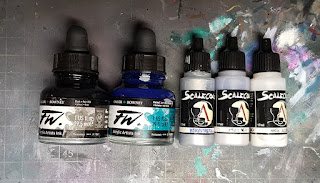
Paints used:
- S75 Heavy metal
- S75 Speed metal
- S75 White Alchemy
- Daler & Rowney Marine blue ink
- Daler & Rowney Black ink
Ma couche de base est un mélange d’heavy metal avec une pointe d’encre bleu et encore moins de noir, l’idée est d’avoir une base teintée mais légèrement désaturé avec le noir mais pas aussi sombre que le black métal.
Now blend pure heavy metal toward you light point, to give you an idea where to put your light points, I try to have the upper part dark and lighten the bottom part since the edge highlight will create a strong contrast and interested.
Another way to find where to put your light is to just put your mini under a direct light and observe where the light panel receive more light.
On commence le travail de dégradé avec du heavy metal pure, l’idée de faire une transition en douceur vers notre point de lumière. En général, je garde mon point supérieur sombre pour créer un contraste avec les arêtes éclaircis, je tire donc ma peinture vers le bas.
Un autre moyen de définir ou poser ces lumières est de simplement mettre votre figurine sous une lampe et d’observer les zones qui reçoivent cette lumière.
Continue blending with speed metal covering a smaller part than last step.
Un autre moyen de définir ou poser ces lumières est de simplement mettre votre figurine sous une lampe et d’observer les zones qui reçoivent cette lumière.
Continue blending with speed metal covering a smaller part than last step.
Je recommence à éclaircir avec du speed metal cette fois en travaillant sur une zone plus petite que la précédente.
Time for shading now, using pure marine blue ink, I put a dot in my deepest corner and blend on the go using the loaded brush technique. If you don’t feel comfortable using this technique, just paint the corner with ink and with a clean brush, blend the transition between the ink and the metal.
The ink takes a bit more time to dry, you should have time to work it out, just remember to leave some of the base tone visible.
C’est le moment de commencer à travailler les ombres, je prends une pointe d’encre bleu que je dégrade dans le frais en utilisant la technique du loaded brush pour plus de rapidité (et aussi parce que je suis fainéant). Pour ceux qui ne se sente pas à l’aise avec cette technique, il est possible de peindre le coin choisi avec de l’encre et pendant que la peinture est encore fraîche, venir assouplir la transition avec un pinceau humide avec de créer le dégradé, l’encre prenant un peu plus de temps à sécher que la peinture acrylique.
N’oublier pas de laisser apparaitre une partie de la couche de base pour avoir une jolie transition.
Shade the darkest corner using black ink, I am again using the loaded brush to do it quicker but, another easy way to do it is to dampen the part you want darker and add a tiny bit of ink in the corner, the ink should blend itself with the water on the support to give you a quick and easy blend.
Je recommence mon loaded brush avec de l’encre noir dans le coin le plus sombre de ma zone. Une façon de traiter cette étape est d’humidifier la zone de peinture et de venir mettre une pointe d’encre sur le coin choisi, si cela se diffuse trop, il est possible de venir adoucir la transition avec un pinceau légèrement humide.
Using white alchemy, I pick up all the edge to give more definition to the shape of the weapon
Je fini mon arme en venant éclaircir toutes les arêtes avec du white alchemy pour venir marquer mes volumes.
Bonus step: even on true metallic, I really like adding a few scratches to make it more interesting, in this case, I make marks with black paint (and not black ink, you want to cover the metal pigment) and just underline it with white alchemy.
Etape bonus : même sur les peintures métalliques, j’adore ajouter des éraflures pour rendre la peinture un peu plus « vivante ». Dans ce cas, j’utilise de la peinture noire (et non pas de l’encre, le but étant d’avoir une éraflure matte qui recouvre les pigments brillants) pour réaliser les marques que je viens souligner avec du white alchemy toujours en allant un peu plus loin que ma marque noire.


