Back on time, precisely because I didn't give any timeline 🙈
Me revoilà avec un nouvel article, comme
prévu ! (Pour une fois…)
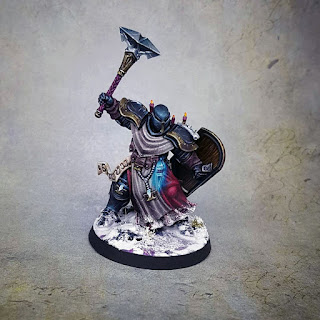
Last time you saw my first Sequitor painted and I know a few people were
curious about the "overworked" wood grain shield; time to debunk this
myth, because it's quick and easy to do.
I'll give you the main process for my Sequitor and a way to work the
effect further like I did on my conversion of Neave last year.
La dernière fois, vous avez pu voir
mon 1er Sequitor peins, plusieurs personne était curieuse sur la
peinture de l’intérieur du bouclier, détail débile typique qui se voit à peine
mais que je ne peux pas m’empêcher de peindre. Voici donc un petit tuto pour l’effet
bois hyper rapide et dont l’effet est convaincant, avec un petit round bonus pour
le pousser un peu plus loin, visible sur le bouclier de Neave que j’ai peint l’année
dernière.
Quick list of the paint I used, you can of course change the colour used
for different kind of wood, it's just what I used on this model (I let you
experiment but highlighting with grey can produce some cool effect, just saying
😉).
Comme toujours, une rapide liste
des couleurs utilisées pour vous donnez une idée. N’hésiter pas à changer les couleurs
pour varier votre type de bois.
GW Rhinox hide
S75 Bosh chestnut
Vallejo Ivory
S75 Chestnut Ink
Some black / du noir
First, give it a nice and smooth coat of Rhinox hide.
On commence par une belle couche de
base avec du Rhinox hide, bien lisse.
Now, it’s time to do the “freehand” part, I recommend having a good
point on your brush for this. Taking some bosh chestnut, I draw some line at
random in more or less, the same direction, this will represent the vein of the
wood. Don’t draw all the line from beginning to end, some variation will go a
long way to sell the effect.
C’est le moment de commencer le dessin
à proprement parler, je recommande d’avoir une bonne pointe sur son pinceau, le
process en est facilité. Je dessine des lignes de longueurs et épaisseurs différentes
avec du bosh chestnut, en gardant une direction générale, ceci afin de réaliser
les veines du bois. Pour les plus courageux, vous pouvez même dessiner les nœuds
du bois pour vos généraux ou figs d’exposition, ça donne toujours un petit cachet
supplémentaire.
Next, I mix bosh chestnut with ivory in 50/50 ratio and draw more line
again at random to give different variety of veins. Don’t follow the precedent
step, but make some new lines instead, this will trick you brain into thinking
there is different depth on a flat surface.
Je continue avec un mix 50/50 d’ivoire
et bosh chestnut en faisant à nouveau des lignes différentes toujours dans le même
sens. J’essaie de ne pas trop repasser sur mes lignes précédentes afin de créer
un effet de profondeur en trompe l’œil.
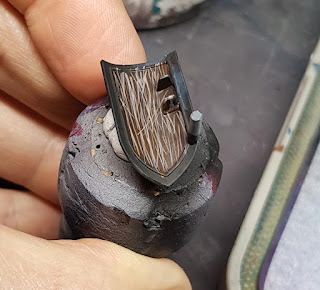
Finish it with an even coat of chestnut ink on the whole surface. Tadaaa
wood grain in minutes!
If the result is too shiny for you, apply a thin layer of matt varnish
to tone it down.
On finit avec une jolie couche d’encore
Chestnut sur l’ensemble de la surface, ce qui va unifier la teinte et lui
donner un aspect de bois lustré. Si le résultat est trop brillant, un peu de
vernis mat permet d’atténuer la brillance.
Et voilà, en prenant mon temps, j’ai
dû mettre 10-15 minutes sur le bouclier avec les photos c’est donc très rapide
à faire.
Bonus round, if you want to give the impression of wooden plank, just add
parallel line of black to mark the plank, highlight the upper edge to give this
3d effect and voila!
(N.B., I find easier to mark the plank after the main process of drawing
instead of marking the plank and painting in between the line after ymmv)
Round bonus, si vous voulez donner
l’impression de planche de bois, ajouter des lignes parallèles avec du noir
afin de différencier les planches, éclaircissez l’arrête supérieurs de ces
planches pour donner l’effet 3d et c’est fini !
(N.B. Je trouves plus facile de
définir les planches après avoir fait le gros du travail plutôt que l’inverse, mais
ceci peut être propre à chacun.)
Until next time…
Anamnesis


Awesome tutorial! Many thanks for did that. Now I need to test it on some nasty skaven shields! :-)
ReplyDeleteEnjoy! Happy it's useful
Delete