Hello dear
reader(s?),
Long-time
no see!
The last blog entry date back from November, so it's been a while.
That was just before I became a father, so that's why I'm a bit busy and to be honest I had no real motivation to write any articles. The global situation and the general tension is getting a bit rough to handle and I find it hard to motivate myself to do anything.
I'm still amazed by the number of people checking the blog though and I'm happy
my tutorials are still being used!
Trying to
get back in the game and with the requests I received on social media, I
made a tutorial on how I painted the base for my latest project, my daughters
of khaine.
The idea
was to have a something akin to a lost temple environment. I did experiment
a bit to find the right balance, but I think this is quite nice while being
really easy to do and replicate.
Which is really relaxing after the strain of painting nmm (seriously what the
heck was I thinking).
Anyway, here
is the result you can expect from this tutorial on my melusai Ironscale.
I’ll be
using a simple 25mm base to show you the process.
I haven’t covered how to build the base
but it’s a piece of cork with a juweela concrete tiles on top, which have been
weathered with a cutter and brute force, the side and crack are then filed with
sandy paste of your choice (dry earth from ak in this instance).
Paint used:
- S75 Brown leather or Ammo one shot primer brown oxide (good to prime with)
- Vallejo Japanese uniform
- Kimera kolors Cloudy sky
- S75 Sandalwood
- S75 Nacar
- S75 Dark forest green
- Vallejo green olive
- S75 Autumn green
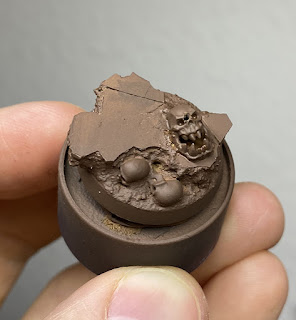
First step
is to cover the whole base with the brown, s75 or ammo, they are very similar
Now as you
may know, I love using sponging for bases, as I find it makes wonderful
texture. So, grab a piece of sponge and start sponging Japanese uniform on the tiles.
Sponge again cloudy sky this time on the tiles again.

Touch up
the sandy part with a bit of brown if you need and drybrush them with sandalwood
Very light
drybrush on the sand again with nacar this time
Now for the
messy part and to give the greenish tint to the base, we will be working with very
diluted paint. I prepare 3 little pool of the 3 greens to have them available
and mess around on the fly.
Start making little pool of dark green, then olive and light touch of autumn green, mixing them on the base and leaving them pooling in the recess as needed wanted. Make some pool on the tiles too to represent moss slowly growing on the stone. You can see it still wet on the picture.
Let it dry overnight or just 2 hours if you’re in Australia or somewhere similar.

The small base and his bigger brother next to each other after a night of drying.
I’m using a
mix of tufts from rival craft, polak, mininatur of different colours but it’s
entirely up to you 😊
I hope you
enjoyed this little tutorial and find it useful, let me know if you need more
precision in comments or just contact me on my social media
Until next
time, take care!
Anamnesis


This tutorial is very helpful.
ReplyDelete