I had to change slightly the effect going from the huge plasma of the Astraeus to the small guns of the inceptor, but anyway it's here in the end!
Une
nouvelle semaine et un nouvel article, ou presque… Ayant toutes les photos
nécessaires, il était temps d’écrire l’article sur le plasma et son osl ayant
reçu plusieurs demandes à ce sujet ! J’ai dû l’adapter légèrement pour les
inceptors par rapport aux immenses plasmas de l’Astraeus mais le principe est
le même.
N.B. I'm using an airbrush for the osl (object source lightning) to make it quicker, but I also possible to do it by hand. Just do some light glaze and you'll have the same effect.
N.B.
J’utilise un aérographe pour faire l’osl rapidement sur ces figs, il est tout à
fait possible de le faire au pinceau en utilisant des glacis.
Paint used / Peintures utilisées:
- Vallejo Black
- Vallejo Dark sea blue
- S75 Irati green
- S75 Goblin flesh
- Schmincke white
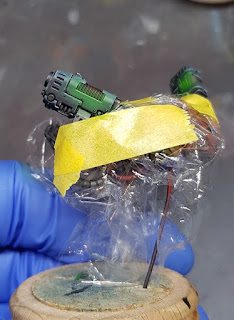
1. I started by doing the airbrush for the osl, since I don't really trust my skill to not mess up the plasma if I did the osl after painting. for I protected the main armour and went on to spray light some irati green around the gun plasma chamber, also hitting her bottom point where the main light will be.
J’ai
commencé par l’osl à l’aéro, n’ayant absolument pas confiance en mes capacités
à ne pas tous foutre en l’air si je fais cette étape à la fin. J’ai donc soigneusement
protégé le travail déjà effectué avant de sprayer délicatement de l’irati green
sur la bordure de la chambre à plasma et sur sa base où ou est prévu mon point
lumineux.
2. To finish the osl, I spray goblin flesh on the main point of heat of the plasma, in this case the middle. here it is just after taking of the protection.
Pour
finir l’osl, je spray du goblin flesh uniquement en dessous de mon point
lumineux du plasma. On retire les protections et on peut continuer au pinceau !
3. Time to take you're brush! I'm painting the chamber with a mix of irati green and dark sea blue, trying to leave the bottom part in irati green where my light will be the brightest.
Je
peins la chambre avec un mélange d’irati et de dark sea blue en essayant de laisser
le point lumineux réalisé à l’aérographe.
4.Using black, I do a light drybrush on the top part furthest from the light point, I'm not too worried about the transition, we will take care on this on the next step.
Avec
du noir, je fais un léger brossage à sec sur la partie haute. Je ne me soucis
pas trop de la transition, ceci sera repris dans la prochaine étape.
5. Using dark sea blue, I lightly drybrush the transition between the black and green base.
Avec
du dark sea blue, je viens faire reprendre ma transition en faisant un léger brossage
entre le vert et noir.
6. Sorry for the blurry pic... in this step, I took some irati green and repainted between the black line on the top to give some contrast.
Désolé
pour cette photo floue… Je reprends mon irati green pour venir marquer le creux
des sillons sur la partie haute afin d’augmenter le contraste.
7. Using irati green again, I touched up the main light around the centre of the chamber with diluted paint, I should slowly creep up the main channel of the plasma (don't have too much water of the brush otherwise it will run all over the channel!), I also painted the bottom part of the mouth of the gun with the same colour.
Je
continue avec l’irati pour reprendre ma source lumineuse avec de la peinture
dilué que je laisse travailler par capillarité. Attention à ne pas avoir trop d’eau
sinon la peinture va remonter partout. J’en profite pour peindre la partie
basse de la bouche du canon avec la même couleur.
8. We're starting to see the effect take shape! With goblin flesh, I push the light on the source of the plasma, I'm again using diluted paint to put a small drop in the middle and let it work its way up around the channel.
L’effet
commence à prendre forme ! Avec du goblin flesh, je pousse la lumière sur
mon point central toujours avec ma peinture diluée et en laissant jouer la
capillarité.
9. To finish the effect, I apply one last highlight using goblin flesh mixed with white, keeping it small and in the middle of the heat point.
Je
fini l’effet en travaillant une petite goutte de goblin flesh mélangé à du blanc
pour le point chaud du plasma.
And voila! Again, this may seem like a lot of steps, but it's actually really fast since the surface is so small.
Et voilà ! Cela peut sembler un grand nombre d'étapes, mais en réalité c'est très rapide vu la taille de la pièce.
I hope you've enjoyed it and find it useful, don't hesitate to leave a comment!
J'espère que vous trouverez ce petit tuto utile, n'hésitez pas à commenter!
You can find my t-shirts, phone case and stuff on Redbubble!
Until next time!
Anamnesis


Merci pour le tuto ! Un effet très différent de ceux que j'ai l'habitude de voir. Et un premier regard sur tes inceptors aussi qui ont l'air très très cool !
ReplyDeleteBonne peinture & merci pour le partage !
Merci Cosmita! Effectivement, c'est un peu différent des effets "habituels", mais je me réjouis de finir ces inceptors!
Delete