Bon presque toutes les photos sont là, ce qui implique un nouveau tuto ! Le premier sera sur les socles de mes nouveaux sylvaneth et le second sur les dryads en elle-même.
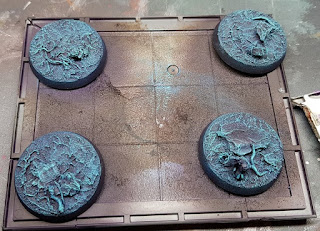
To give you an idea, here is the result of this tutorial:
Voici un exemple sur résultat obtenu avec ce tuto :
The idea behind was to make some base inspired by the artwork of the realm of Ulgu, some kind of secretive land and finding a darkish original painting scheme but keeping it colourful.
Let me know if you think I succeeded :)
L'idée derrière était de créer des socles du royaume d'Ulgu inspiré des rares artworks disponibles, un royaume étrange et sombre tout en le gardant plein de nuances colorées.
A vous de me dire si le résultat transmet ce sentiment :)
Building the base - Réaliser le socle
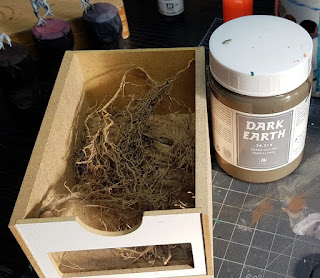
Materials used - Le matos nécessaire : |
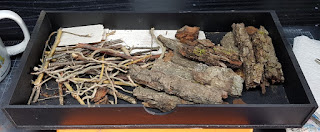
| Everything found on the ground - en provenance directe de la forêt |
Small dried roots and branches - Racines et branches séchées
Vallejo Dark earth paste (You can remplace it by simple sand and pva glue) (peut être remplacé par du sable et de la colle blanche)
Bits and pieces like little animals or skulls - des petites pièces, animaux ou crânes selon préférence
1. I choose a few pieces of bark and branches and cut them to my liking. I make sure they fit on the base. I'm using superglue because I don't want to wait for the pva glue to dry.
Je sélectionne quelques bouts d'écorces et de branches que je coupe selon mes besoins, en gardant en tête la dimension des socles. Je les colle à la superglue pour gagner un peu de temps.
2. All the black part of the base receive a generous amount of vallejo paste, a few chosen spots on the biggest piece of bark receive a tiny amount to add some texture.
Je noie le reste du socle dans de la pâte Vallejo ainsi que sur des petits endroits sur les gros morceaux d'écorce afin de rajouter de la texture.
3. When the paste is still wet, I add a few pieces of roots, skulls or any bits. On to painting !
Quand la pâte est encore fraîche, j'en profite pour enfoncer des petits bouts de racines ainsi que des p'tits bits selon les besoins. Il ne reste plus qu'à peindre tout ça !
Painting - La peinture
Colours used - Couleurs utilisées
Scalecolor Eldandil Violet
Vallejo Turquoise
Scalecolor Caribbean blue
Scalecolor Hykey yellow
Scalecolor Arbuckles brown
Scalecolor Brown gray
Scalecolor Rainy gray
White
Vallejo nocturna Purple Shadow
Scalecolor Boreal tree green
1. On a black undercoat, I painted the whole base with Eldandil violet.
Sur une sous-couche noire, je peins l'ensemble du socle en Eldandil violet.
2. Heavy drybrush on everything with Turquoise.
Gros brossage à sec sur l'ensemble avec du turquoise
3. Drybrush again with Caribbean blue.
En recommence avec du Caribbean blue.
4. Last light drybrush of Hykey yellow.
On finit avec un léger brossage de hykey yellow.
5. Paint all the piece of rocks/barks with arbuckles brown.
Peigner tous les bouts d'écorces/rochers avec du arbuckles brown.
6. I highlight the rock with a heavy stippling of brown gray.
J'éclairci les rochers avec du pointillé bien appuyé de brown gray.
7. I stipple again using rainy gray this time, being a bit lighter than the previous step.
Je recommence avec du rainy gray en étant moins généreux que l'étape précédente.
8. Paint all the branches and roots with purple shadow.
Peigner toutes les branches et racines avec du purple shadow.
9. Light drybrush with pure white on the stone, branches and roots, being careful not to go too much on the blue part of the base.
Dernier léger brossage à sec avec du blanc pur en faisant attention de ne pas trop déborder sur les parties bleues.
10. Last step is painting the small details you added, blacken the rim of the base. To finish the effect and break the monotony of the blue, I glaze some eldandil violet on the blue part and some boreal tree green on the rocks to represent moss.
Dernière étape, on peint tous les petits détails qu'on a ajouté, je n'entre pas en détails là-dessus, ça ne me semble pas nécessaire. Pour casser la monotonie du bleu, je profite de faire des glacis de eldandil violet sur les zones bleues, les rochers reçoivent des glacis de boreal tree green afin de représenter de la mousse.
11. After gluing the mini to the base, I add all sorts of tufts, bushes and stuff to bring some life to the base.
Done! It's a lot of steps but they're really easy and quick.
Après avoir collé la figurine sur son socle, je rajoute les touffes d'herbes, petits buissons et compagnie pour agrémenter le socle et le rendre plus vivant.
Après avoir collé la figurine sur son socle, je rajoute les touffes d'herbes, petits buissons et compagnie pour agrémenter le socle et le rendre plus vivant.
Fini ! C'est beaucoup d'étapes mais ça va en réalité très vite.
Tufts and bushes are a mix from serious play scenic, mininature and army painter, you should be able to find most of them easily on google!
Les buissons, touffes et autres herbes ont une provenance mix entre serious play scenic, mininatur et army painter. Une recherche google devrait vous permettre de trouver des fournisseurs à proximité de chez vous !
Next article, the dryad!
Prochain article, la dryad!
For those who wish to support me, you can find my ko-fi page here or some cool t-shirt I made on Redbubble! It's totally optional and it won’t stop me posting free tutorial :)
Pour ceux qui souhaite participer, une page Kofi est à disposition ou vous pouvez trouver mes t-shirts sur Redbubble ! C'est totalement optionnel et ne m’empêchera aucunement de continuer à écrire des tutoriels gratuit :)
Until next time!
Anamnesis


No comments:
Post a Comment