Okay, I'm late, like much more than I expected to be honest, uh oh...
Juste à temps pour Halloween, voici le tutoriel sur mes petits fantômes! En fait, non, je suis super à la bourre sur cet article qui était censé sortir pour le 31 octobre, ahem.
A quick reminder, the idea behind my nighthaunt was to be able to paint them quickly to be able to field a fully painted army before 2025.
I'm using the airbrush to speed up the process, it's not a magical tool by any means, and usually if you're doing one mini at a time it's easier to paint with a brush, but when you're doing 10 miniatures together, you have a nice consistency across all of them.
Pour rappel, le but de cette armée était de pouvoir les peindre rapidement afin d'avoir une force complètement peinte dans un délai raisonnable.
J'utilise l'aérographe afin de gagner du temps sur la peinture à la chaîne, c'est n'est pas un outil magique et si vous faites une figurine à la fois c'est souvent plus rapide au pinceau. Le gain majeur est la cohérence sur l'ensemble de l'armée, qui n'est pas toujours facile à reproduire au pinceau.
And if you're interested in airbrushing, there is a nice Kickstarter from Cult of paint of a special serie partnering with harder & steenbeck which is what I consider the best airbrushes running now until the 12th November normally.
The link for the curious, total disclosure, I'm not affiliated with them and gain nothing from this, I just really like this airbrush and think the small tweaks they propose look really good.
Et si l'aérographe vous intéresse, il y a un joli kickstarter de Cult of paint qui propose une version spéciale de l'Infinity de chez Harder & Steenbeck qui est pour moi le meilleurs modèle du marché, à suivre jusqu'au 12 novembre.
Le lien pour les intéressé-e-s ou curieux, pour être totalement transparent, je ne suis pas affilié à eux et je ne gagne rien en échange de ce lien, je suis juste fan de cette aéro et je trouve que les modifications apportent un petit plus bienvenu.
So, to paint spooky ghost and textured clothes you'll need:
Le matos requis:
- An airbrush* / aérographe (Harder & steenbeck infinity here)
- A brush with a good point/ pinceau avec une bonne pointe
- Scale 75 Arbuckles brown
- S75 Shrapnel red
- S75 Miskatonic grey
- S75 Walnut
- S75 Surfer orc flesh
- S75 Despair green
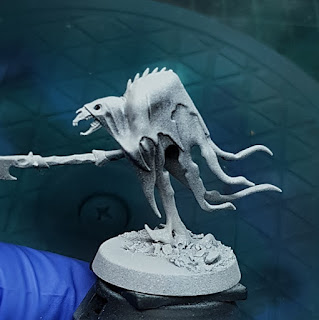
Comme quasiment tous mes projets, je commence par une sous-couche noire avec un voile blanc par-dessus, afin de délimiter rapidement les volumes (preshading pour les intimes). J'insiste un peu plus sur le blanc pour avoir une base bien claire pour le travail à l'aéro.
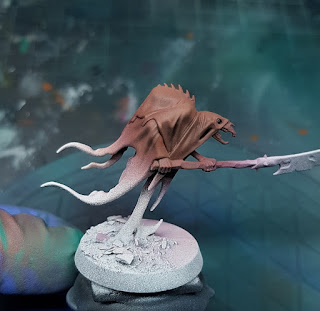
I'll start by doing the cloth part using arbuckles brown as my basecoat, spraying lighter on the highlight part, you want to really cover the shadowy part usually.
Je commence par les tissus avec un premier passage d'arbuckles brown comme couche de base, je n'appuie pas trop sur les parties claires, le but étant de couvrir les ombres principalement.
Next step is to highlight the brown with shrapnel red, following the light spot created by the preshading.
Prochain étape, j'éclaircie le brun avec du shrapnel red en suivant l'éclairage du preshading.
Finish the cloth part by highlighting smaller part with shrapnel red mixed with a bit of miskatonic grey, about 70 red to 30 grey.
Je fini la partie tissu aéro avec un éclaircissement de shrapnel red avec du miskatonic grey (environ 70/30).
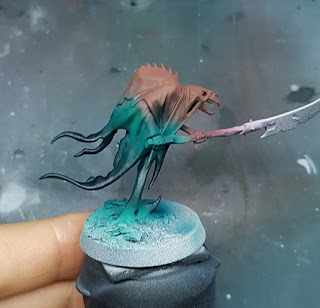
We start the ghostly part now, you'll have to be careful when you spray to not hit the upper part of the cloth where you don't want the ghostly effect. Start spraying surfer orc flesh from the bottom giving a light coat everywhere you don't have brown, try to blend with lighter spray the part between the brown cloth and the ectoplasmic surface.
Don't be afraid to spray a bit on the brown to really have a transition between the two tones.
C'est le moment d'entamer la partie fantomatique, il est important de faire attention sur cette étape à ne pas sprayer toute la partie du tissu déjà travaillée.
J'utilise le surfer orc flesh pour gentiment sprayer les parties basses qui sont encore blanche, j'en profite pour venir gentiment sur la base du tissu brun pour lier les zones et donner cet effet fantomatique de transition.
It's time to shade the green with despair green, this paint is quite transparent, which work in our favour for this. You want to spray the end of ghostly bits to darken them and try to shade the shadow spraying from underneath the mini, if everything goes smoothly you should have something like the picture above. Don't worry too much about it, you can do touch up with a brush after.
C'est le moment d'assombrir le vert avec du despair green. C'est une peinture très transparente et l'utilisation se rapproche plus d'un wash/glacis que d'une peinture standard. L'idée est d'insister sur les extrémités pour les foncer et d'assombrir également les plis en sprayant par en dessous, tout en faisant attention au partie déjà traitées.
Si tous se passe bien, vous devriez avoir un résultat similaire à l'image ci-dessus. Il est toujours possible de rattraper les détails avec un pinceau par la suite.
Continuing now with a brush, I refine the shade with despair green if needed, then highlight the edge of the ghostly part with surfer orc flesh.
On commence le travail au pinceau, on affine les ombres avec du despair green au besoin et on éclairci les arêtes des parties fantomatiques avec du surfer orc flesh.
Time to texture the cloth, using diluted walnut, I start drawing line in criss-cross on the lightest part of the cloth. You want to simulate texture which I visible on the part where the light hit them. On infantry I do a lighter criss-cross and take more times on heroes and such.
C'est le moment de créer l'effet de texture, avec du walnut dilué, je trace des lignes croisées sur les parties exposées du tissu. L'idée est de simulé la structure d'un tissu visible sur les parties en lumière principalement. Sur les unités, je fais ce travail assez rapidement et grossièrement, tandis que je me prends mon temps sur les héros.
To finish the effect, redo some criss-cross with miskatonic grey diluted, trying to do smaller line and go over some of them. Always check to see if at arm's length the pattern is still visible, you don't want it too small (That "trick" is good for every project to check for contrast and such).
Je fini l'effet en éclaircissant mes textures avec du miskatonic grey dilué, en faisant des lignes plus petites, en revenant sur certaines et en créant des nouvelles afin d'apporter de la diversité.
C'est intéressant de regarder la figurine à bout de bras pour voir si l'effet est visible à distance et pas uniquement à 3cm de la figurine! (Ce petit check est utile pour la peinture en général afin de vérifier la visibilité et lecture d'une pièce!)
That's all folks!
J'ai commencé à travailler sur le tank primaris Astraeus pour mes knight of the Chalice, ce qui va me prendre un moment, je ne sais donc pas quand sera le prochain article en toute honnêteté; si vous avez des questions ou des sujets qui vous intéresse n'hésitez pas à me contacter!
 |
| Small teaser! |


