29 Mar 2019

[Tutorial] Plasma effect and osl

Alrighty another week (or two...) and I finally have all the pictures for the tutorial on the plasma.
I had to change slightly the effect going from the huge plasma of the Astraeus to the small guns of the inceptor, but anyway it's here in the end!

Une nouvelle semaine et un nouvel article, ou presque… Ayant toutes les photos nécessaires, il était temps d’écrire l’article sur le plasma et son osl ayant reçu plusieurs demandes à ce sujet ! J’ai dû l’adapter légèrement pour les inceptors par rapport aux immenses plasmas de l’Astraeus mais le principe est le même.

N.B. I'm using an airbrush for the osl (object source lightning) to make it quicker, but I also possible to do it by hand. Just do some light glaze and you'll have the same effect.

N.B. J’utilise un aérographe pour faire l’osl rapidement sur ces figs, il est tout à fait possible de le faire au pinceau en utilisant des glacis.

Paint used / Peintures utilisées:
Anamnesis studio

  • Vallejo Black
  • Vallejo Dark sea blue
  • S75 Irati green
  • S75 Goblin flesh
  • Schmincke white

Anamnesis studio
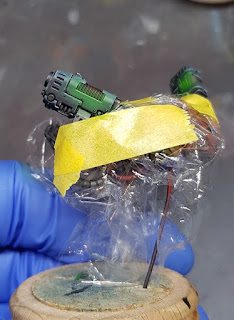
1. I started by doing the airbrush for the osl, since I don't really trust my skill to not mess up the plasma if I did the osl after painting. for I protected the main armour and went on to spray light some irati green around the gun plasma chamber, also hitting her bottom point where the main light will be.
J’ai commencé par l’osl à l’aéro, n’ayant absolument pas confiance en mes capacités à ne pas tous foutre en l’air si je fais cette étape à la fin. J’ai donc soigneusement protégé le travail déjà effectué avant de sprayer délicatement de l’irati green sur la bordure de la chambre à plasma et sur sa base où ou est prévu mon point lumineux.

Anamnesis studio
2. To finish the osl, I spray goblin flesh on the main point of heat of the plasma, in this case the middle. here it is just after taking of the protection.
Pour finir l’osl, je spray du goblin flesh uniquement en dessous de mon point lumineux du plasma. On retire les protections et on peut continuer au pinceau !

Anamnesis studio
3. Time to take you're brush! I'm painting the chamber with a mix of irati green and dark sea blue, trying to leave the bottom part in irati green where my light will be the brightest.
Je peins la chambre avec un mélange d’irati et de dark sea blue en essayant de laisser le point lumineux réalisé à l’aérographe.

Anamnesis studio
4.Using black, I do a light drybrush on the top part furthest from the light point, I'm not too worried about the transition, we will take care on this on the next step.
Avec du noir, je fais un léger brossage à sec sur la partie haute. Je ne me soucis pas trop de la transition, ceci sera repris dans la prochaine étape.

Anamnesis studio
5. Using dark sea blue, I lightly drybrush the transition between the black and green base.
Avec du dark sea blue, je viens faire reprendre ma transition en faisant un léger brossage entre le vert et noir.

Anamnesis studio
6. Sorry for the blurry pic... in this step, I took some irati green and repainted between the black line on the top  to give some contrast.
Désolé pour cette photo floue… Je reprends mon irati green pour venir marquer le creux des sillons sur la partie haute afin d’augmenter le contraste.

Anamnesis studio
7. Using irati green again, I touched up the main light around the centre of the chamber with diluted paint, I should slowly creep up the main channel of the plasma (don't have too much water of the brush otherwise it will run all over the channel!), I also painted the bottom part of the mouth of the gun with the same colour.
Je continue avec l’irati pour reprendre ma source lumineuse avec de la peinture dilué que je laisse travailler par capillarité. Attention à ne pas avoir trop d’eau sinon la peinture va remonter partout. J’en profite pour peindre la partie basse de la bouche du canon avec la même couleur.

Anamnesis studio
8. We're starting to see the effect take shape! With goblin flesh, I push the light on the source of the plasma, I'm again using diluted paint to put a small drop in the middle and let it work its way up around the channel.
L’effet commence à prendre forme ! Avec du goblin flesh, je pousse la lumière sur mon point central toujours avec ma peinture diluée et en laissant jouer la capillarité.

Anamnesis studio
9. To finish the effect, I apply one last highlight using goblin flesh mixed with white, keeping it small and in the middle of the heat point.
Je fini l’effet en travaillant une petite goutte de goblin flesh mélangé à du blanc pour le point chaud du plasma.

And voila! Again, this may seem like a lot of steps, but it's actually really fast since the surface is so small.
Et voilà ! Cela peut sembler un grand nombre d'étapes, mais en réalité c'est très rapide vu la taille de la pièce.

I hope you've enjoyed it and find it useful, don't hesitate to leave a comment!
J'espère que vous trouverez ce petit tuto utile, n'hésitez pas à commenter!

You can find my t-shirts, phone case and stuff on Redbubble!
Vous pouvez retrouver mes t-shirts, protection de portable et autres sur Redbubble !

Until next time!
Anamnesis

15 Mar 2019

[Tutoria] Painting a sylvaneth dryad

And here we go, second part on my dryad, you saw the base, time to paint the little twig on top!

Nous y voilà, la deuxième partie du tuto sur mes sylvaneth sur les dryads en elle-même!

Anamnesis studio

Paint used / Peintures utilisées :

  • Vallejo Black
  • Scale75 Tindalos red
  • Scale75 Sandalwood
  • Scale75 Nacar
  • Scale75 Huldra blue
  • Scale75 Hykey yellow
  • Vallejo Fluo orange 
  • White
Anamnesis studio
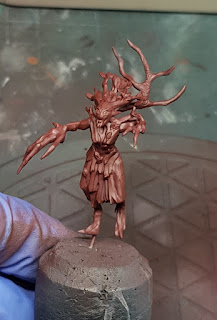
1. First thing first, I undercoat my miniature with grey and do a zenithal highlight with white primer to give some depth, I'm using an airbrush in this case.
Première chose, je sous couche ma figurine en gris avant de faire un voile zénithal avec du blanc pour faire ressortir les reliefs. Je le fais à l'aero parce que le temps est pourri ici.

Anamnesis studio
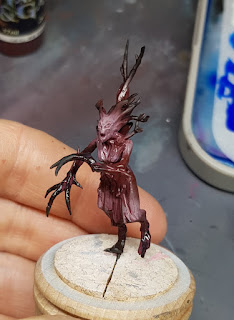
2. I airbrush my first colour with tindalos red all around, you may think the zenithal light is useless, but the colour is slightly lighter on the white!
Première couleur, tindalos red sur l'ensemble de la figurine. On pourrait penser que le zénithale de blanc est inutile mais la couleur est légèrement plus claire sur les parties blanches, difficile à voir en photo.

Anamnesis studio
3. First airbrush light using sandalwood to highlight a few key places, in this case, the face, knees, torso, butt and shoulder.
Premiers éclaircissements avec du sandalwood en choisissant certains endroits précis, typiquement le visage, les genoux, les épaules, le torse et les fesses.

Anamnesis studio
4. I blend the transition by spraying tindalos red again.
J’adoucis la transition en reprenant mon tindalos et fond les deux couleurs.

Anamnesis studio
5. Next is airbrushing the black, I keep this for the claws, feet and end of branches only. I messed it up and sprayed some black on the face though.
Je travaille les parties noires en sprayant les extrémités comme les griffes, les pieds et la fin des branches. J’ai d’ailleurs un peu raté la transition.

Anamnesis studio
6. Last airbrush step to highlight my sandalwood part with nacar trying not to go overboard.
Dernière partie à l’aérographe, je fini mes éclaircissements avec un léger passage de nacar sur les parties travailler avec le sandalwood.

Anamnesis studio
7. Time for a big wash of diluted tindalos red to give reddish hue to the body. Don't let it pool too much though.
Il est temps de passer un gros lavis de tindalos red dilué tout en faisant attention à ne pas le laisser trop s’accumuler.

Anamnesis studio
8. Time to highlight the body, with sandalwood drawing thin line toward the lightest point of your highlight
Je passe au pinceau et reprends mes zones claires avec des fines lignes de sandalwood que je tire vers mon point le plus claire.

Anamnesis studio
9. And again for the final highlight using nacar, doing thin line again. I'm also painting the leaves, I'm using a mix of huldra blue and hikey yellow.
Je recommence avec du nacar cette fois, je profite également pour peindre le pagne de feuilles avec un mélange de huldra blue et hikey yellow.

Anamnesis studio
10. Highlight the leaves adding yellow to the previous mix.
J’éclairci les feuilles en ajoutant du hikey yellow.

Anamnesis studio
11. Final light by adding more yellow, it should look almost greenish.
Et encore un fois avec plus de jaune, le mélange tire gentiment sur le vert.

Anamnesis studio
12. Wash the recess only and the in between the leaves with pure huldra blue. I'm using this step to paint all the part received the orange with pure white, the fluo paint don't cover well and work better on a white base.
Je fais un lavis d’Huldra bleu uniquement dans les creux, afin de finir les feuilles. J’en profite pour peindre toutes les futures zones orange avec du blanc pur, les peintures fluo n'étant pas couvrantes.

Anamnesis studio
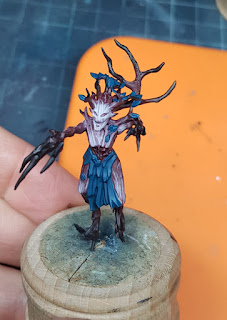
13. Fun time! Apply your orange fluo on the white part. I glaze around to eye to create a small glow.
La partie sympa ! On vient repeindre toutes les zones blanches avec de l’orange fluo, je fais également un léger glacis autour des yeux pour créer un effet de lueur.

Anamnesis studio
14. I highlight the orange adding white and painting a few key spots to create some lighter part. If the white is too strong I glaze back some orange to smooth the transition.
J’éclairci mon orange en ajoutant du blanc afin de créer des variations sur les zones des runes et yeux. Si le blanc est trop violant, je reprends la transition avec un petit glacis d’orange.

And voila!
Et voilà !

I hope you've enjoyed it and find it useful!
J'espère que vous trouverez ce petit tuto utile!

Find my t-shirts on Redbubble!
Retrouver mes t-shirts sur Redbubble !

Until next time!
Anamnesis


1 Mar 2019

[Tutorial] Sylvaneth base from Ulgu

So, I finally have all the picture for the tutorial on the base for my new sylvaneth, first one will be on how I made and painted the base, the second one will be on the dryads themselves.
Bon presque toutes les photos sont là, ce qui implique un nouveau tuto ! Le premier sera sur les socles de mes nouveaux sylvaneth et le second sur les dryads en elle-même.

To give you an idea, here is the result of this tutorial:
Voici un exemple sur résultat obtenu avec ce tuto :
Anamnesis studio tutorial
The idea behind was to make some base inspired by the artwork of the realm of Ulgu, some kind of secretive land and finding a darkish original painting scheme but keeping it colourful.
Let me know if you think I succeeded :)

L'idée derrière était de créer des socles du royaume d'Ulgu inspiré des rares artworks disponibles, un royaume étrange et sombre tout en le gardant plein de nuances colorées.
A vous de me dire si le résultat transmet ce sentiment :)

Building the base - Réaliser le socle

Materials used - Le matos nécessaire :

Anamnesis studio tutorial
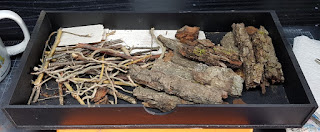
Everything found on the ground - en provenance directe de la forêt
Anamnesis studio tutorial
Wood barks - Morceau d'écorces
Small dried roots and branches - Racines et branches séchées
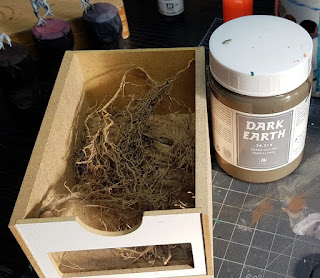
Vallejo Dark earth paste (You can remplace it by simple sand and pva glue) (peut être remplacé par du sable et de la colle blanche)
Bits and pieces like little animals or skulls - des petites pièces, animaux ou crânes selon préférence 

Anamnesis studio tutorial
1. I choose a few pieces of bark and branches and cut them to my liking. I make sure they fit on the base. I'm using superglue because I don't want to wait for the pva glue to dry.
Je sélectionne quelques bouts d'écorces et de branches que je coupe selon mes besoins, en gardant en tête la dimension des socles. Je les colle à la superglue pour gagner un peu de temps.
Anamnesis studio tutorial
2. All the black part of the base receive a generous amount of vallejo paste, a few chosen spots on the biggest piece of bark receive a tiny amount to add some texture.
Je noie le reste du socle dans de la pâte Vallejo ainsi que sur des petits endroits sur les gros morceaux d'écorce afin de rajouter de la texture.
Anamnesis studio tutorial
3. When the paste is still wet, I add a few pieces of roots, skulls or any bits. On to painting !
Quand la pâte est encore fraîche, j'en profite pour enfoncer des petits bouts de racines ainsi que des p'tits bits selon les besoins. Il ne reste plus qu'à peindre tout ça !

Painting - La peinture

Colours used - Couleurs utilisées

Scalecolor Eldandil Violet
Vallejo Turquoise
Scalecolor Caribbean blue
Scalecolor Hykey yellow
Scalecolor Arbuckles brown
Scalecolor Brown gray
Scalecolor Rainy gray
White

Vallejo nocturna Purple Shadow
Scalecolor Boreal tree green

Anamnesis studio tutorial
1. On a black undercoat, I painted the whole base with Eldandil violet.
Sur une sous-couche noire, je peins l'ensemble du socle en Eldandil violet.
Anamnesis studio tutorial
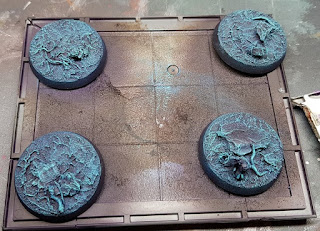
2. Heavy drybrush on everything with Turquoise.
Gros brossage à sec sur l'ensemble avec du turquoise
Anamnesis studio tutorial
3. Drybrush again with Caribbean blue.
En recommence avec du Caribbean blue.
Anamnesis studio tutorial
4. Last light drybrush of Hykey yellow.
On finit avec un léger brossage de hykey yellow.
Anamnesis studio tutorial
5. Paint all the piece of rocks/barks with arbuckles brown.
Peigner tous les bouts d'écorces/rochers avec du arbuckles brown.
Anamnesis studio tutorial
6. I highlight the rock with a heavy stippling of brown gray.
J'éclairci les rochers avec du pointillé bien appuyé de brown gray.
Anamnesis studio tutorial
7. I stipple again using rainy gray this time, being a bit lighter than the previous step.
Je recommence avec du rainy gray en étant moins généreux que l'étape précédente.
Anamnesis studio tutorial
8. Paint all the branches and roots with purple shadow.
Peigner toutes les branches et racines avec du purple shadow.
Anamnesis studio tutorial
9. Light drybrush with pure white on the stone, branches and roots, being careful not to go too much on the blue part of the base.
Dernier léger brossage à sec avec du blanc pur en faisant attention de ne pas trop déborder sur les parties bleues.
Anamnesis studio tutorial
10. Last step is painting the small details you added, blacken the rim of the base. To finish the effect and break the monotony of the blue, I glaze some eldandil violet on the blue part and some boreal tree green on the rocks to represent moss.
Dernière étape, on peint tous les petits détails qu'on a ajouté, je n'entre pas en détails là-dessus, ça ne me semble pas nécessaire. Pour casser la monotonie du bleu, je profite de faire des glacis de eldandil violet sur les zones bleues, les rochers reçoivent des glacis de boreal tree green afin de représenter de la mousse.
Anamnesis studio tutorial
11. After gluing the mini to the base, I add all sorts of tufts, bushes and stuff to bring some life to the base. 
Done! It's a lot of steps but they're really easy and quick.
Après avoir collé la figurine sur son socle, je rajoute les touffes d'herbes, petits buissons et compagnie pour agrémenter le socle et le rendre plus vivant. 
Fini ! C'est beaucoup d'étapes mais ça va en réalité très vite.
Tufts and bushes are a mix from serious play scenic, mininature and army painter, you should be able to find most of them easily on google!
Les buissons, touffes et autres herbes ont une provenance mix entre serious play scenic, mininatur et army painter. Une recherche google devrait vous permettre de trouver des fournisseurs à proximité de chez vous !
Next article, the dryad!
Prochain article, la dryad!
For those who wish to support me, you can find my ko-fi page here or some cool t-shirt I made on Redbubble! It's totally optional and it won’t stop me posting free tutorial :)
Pour ceux qui souhaite participer, une page Kofi est à disposition ou vous pouvez trouver mes t-shirts sur Redbubble ! C'est totalement optionnel et ne m’empêchera aucunement de continuer à écrire des tutoriels gratuit :)
Until next time!
Anamnesis