Showing posts with label snow. Show all posts

27 Feb 2020

[Review] Krycell Precision Ice and snow - ultra snow product

FULL DISCLOSURE - I didn't pay for this product, Krycell sent me two bags of ultra snow to review it, following my first review from 2018. Now you know everything.

Flash news, this article was supposed to be published at the beginning of the month, but as I was properly blessed by father nurgle and I was sick in bed for more or less two weeks so my schedule has been put to rest, much like me. Allergies season doesn't help either.

Seriously, I haven't been this sick in a long time
Alright, it's no secret that I really like snow base, particularly on dark miniature, it makes them pop, I look shiny and it’s always fun to do. 

So, when Krycell send my new a little bag of their new snow to review it, I couldn’t refuse! You can find my first review on their product here.

Let’s start with the basics and the product description:

The ultra snow is supposed to be functional for all scales, compared to the fine and extra one which are more oriented towards specific scales.
The presentation show it used with silicon to make a past which can be washed and put in place after curing, you can easily make trace in the snow. I let you the judge of the result but personally I think it looks great! You can clearly see the glitter of the all the little fragment on the video.

Here is the link of the presentation video to have a look by yourselves

Bag in hand, I wanted to experiment a bit with this product and what you can do with it.
To be honest, I had no silicon and was too lazy and sick to go buy some. Not a problem since I have quite a selection of products to make a few tests. Also, you can see the result in much better quality in the video.
Though, Krycell is working on an adhesive to replace silicon and it should be available soon.

Here is what I used: pva glue, uhu glue, water effect gel and krycell adhesive and some fine snow, more on that later.

Following this, a few pictures of this experiment

First quick test on a plastic pot, it’s black to have a better view of the transparent properties

Anamnesis studio
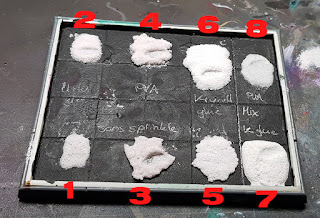
  1. Ultra snow mixed with water effect, it looks a bit brittle and it’s not really sticky, I wouldn’t not recommend this one
  2. Mixed with our trusted pva, the effect is interesting and easy to use, the bond is strong, and nothing move or rub off
  3. Same as the second but I sprinkled some ultra snow on top, it gives a fresh snow look
More test on a plastic base painted black.
Anamnesis studio
  1. Snow with uhu glue, work quite well but in this case very sticky, strong bond, quite transparent 
  2. Same but with a light sprinkle of snow powder on top, I also made an imprint in the snow with a boot, not the best since it’s sticky and the glue tend to level the mix
  3. Second test with pva and snow, second imprint test with the same boot, also hard because of the stickiness but it holds the print quite well
  4. Still pva but with a sprinkle of powder on top, the imprint is easier this time and the shape hold well, bond is strong
  5. Using the krycell adhesive mixed with the snow powder this time, work well and look more natural, though the bond is weaker, and the powder can rub off, but you can circumvent this with a coat of varnish at the end though
  6. Same as before but with a sprinkle on top again, the imprint work well and hold the shape, bond is the same as before, I recommend varnishing though
  7. Now, this one is a bit different I mixed krycell adhesive with the ultra snow and added a bit of fine snow. That’s probably my favourite result of the bunch and the one I used on my stormcast; you can see the result at the end
  8. Same mix of ultra and fine snow but with pva glue, similar result but I prefer the krycell adhesive for this one.
Anamnesis studio
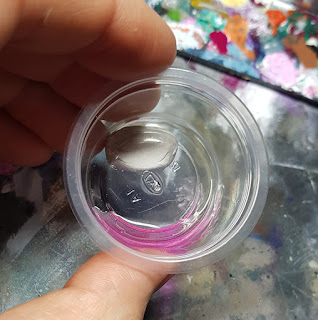
Bonus pic, my mix of ultra and fine in the mixing cup, looks like a fresh avalanche, the reflection is beautiful and looks so realistic, the particles are shiny and react like a little diamond when you move the light around.

A proper example on my latest stormcast in her happy snow tundra using mix 7
Anamnesis studio

And this is the end of my review! As Krycell has been generous when they sent me 2 bags, I will be giving the second away on my Instagram with the instruction booklet so one of you can enjoy this fun product! This should last one week till the 5th March 2020.

You can find Krycell product on their website: www.precisioniceandsnow.com

Thanks to them for giving me the chance to review this product!

Until next time,

Anamnesis

20 Dec 2019

[Tutorial] Stormcast snowy base


Hello again!

So, this will probably be the last article this year, a few people were curious about my snowy base on my stormcast so here is a new tutorial similar to the nighthaunt one I did a few months ago (link at the end of this post), how time flies!
Voici donc le dernier article de l’année, plusieurs personnes étaient curieuses sur mes socles de stormcast, voici donc un tuto similaire à celui des nighthaunt sur des socles enneigés (lien en fin d'article).

Nothing too fancy, Stormcast are already quite tall and I didn't want to add height with cork or something similar (except for heroes and monster, you may see it next year...), so the base is simple to prepare and quick. 
Rien de très spécial, l’objectif était de faire des socles simples et rapides et ne pas trop les surélever vu la taille des stormcast.

Anamnesis studio

What you need – le matos:

  • Sand paper / papier de verre
  • Some base / des socles
  • Few pieces of slate or pine bark / des morceaux d’écorces ou d’ardoises
  • Some snow, I really like Krycell precision ice and snow (find my full review here) / de la neige, je suis très partial sur neige de chez Krycell pour son résultat (le test complet ici)
  • Resin, I’m using uv resin because it’s faster, but normal resin or even a few layers of pva glue should do the trick / de la résine, j’utilise la résine uv pour la rapidité, mais de la résine normale ou même de la colle blanche fais l’affaire
  • Sand and dirt / du sable et de la terre


Anamnesis studio
I won’t go too much into detail for the preparation, there isn’t much to it and a few steps a quite similar with this tutorial on my nighthaunt base.
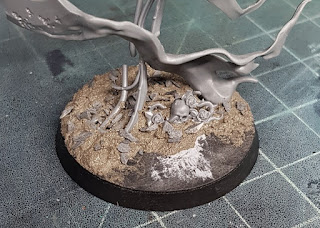
In short, sand the base, glue a few pieces of barks or slate, add some sand and dirt around the bark and you’re good to go!
Don’t forget to prime it, the bark sucks up the paint.
Je ne vais pas trop rentrer dans le détail de préparation que vous pouvez retrouver dans le tuto nighthaunt.
Pour faire simple, je ponce le socle, je colle des bouts d’écorce ou ardoise et j’ajoute du sable autour de l’écorce, un petit crâne ou deux et c’est bon ! N'oubliez pas la sous-couche l'écorce absorbe énormément la peinture.
 Anamnesis studio

Now we’re ready to paint it! 

Passons à la peinture!


As you may have found if you follow my tutorials, I really like using a sponge for texturing, this one is no different.
Dans la continuité de mes autres tutos, j’utilise beaucoup des éponges pour faire mes textures.

Paint used / peintures utilisées:

  • Kimera Kolors Magenta
  • KK Phtalo green
  • KK White
  • Liquitex magenta quinacridone ink
  • Vallejo Dark sea blue
  • S75 Caspian blue
  • S75 Artic blue

 Anamnesis studio
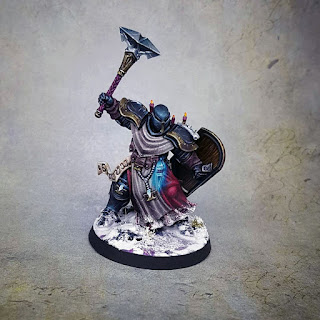
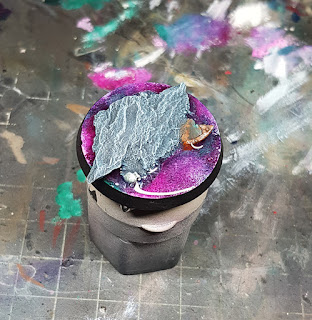
After the black primer step, I take some magenta and sponge it around the bark pieces to colour where the ice will be, trying to leave some black spots for the next colour.
Après la sous couche noir, j’utilise l’éponge trempé dans du magenta pour marquer les zones de glace, je laisse intentionnellement des parties noires pour la seconde couleur.
 Anamnesis studio

When it’s still wet and without cleaning the sponge, I take some white and sponge on my magenta to create a lighter tone.
Quand c’est encore humide et sans rincer l’éponge, j’utilise un peu de blanc pour venir éclaircir le magenta.
Anamnesis studioAnamnesis studio
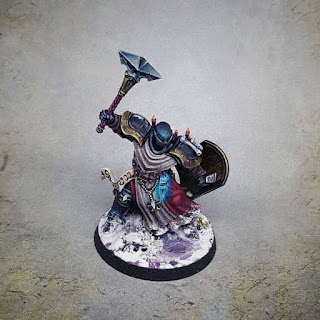
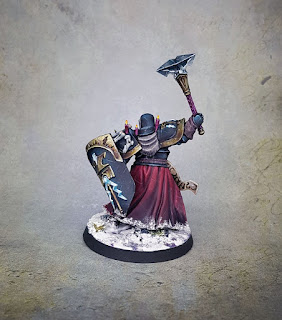
I repeat this process, with phtalo green then white on the part I left black to create variety.
The mix between magenta and green result in a nice blue-purple tone.
Je recommence le processus avec du phtalo green puis du blanc pour venir créer de la variété, le mélange des deux teintes crée un joli violet pâle.
Anamnesis studio
Anamnesis studio


Base the bark and sand with dark sea blue.
L’écorce et le sable reçoivent une couche de dark sea blue.
Anamnesis studio

Drybrush the rock with Caspian blue.
Le caillou est brossé à sec avec du caspian blue.
 Anamnesis studio

Again, with artic blue.
On recommence avec de l’artic blue cette fois.
Anamnesis studio

And finish with a light drybrush of white.
Et je fini avec un léger brossage à sec de blanc.
Anamnesis studio

To bring back vibrancy, I glazed magenta and phtalo green on the ice part.
Paint the rime and the few bits added and you’re ready for the resin.
Pour forcer le contraste, je fais des glacis de magenta et vert sur les parties glacées.
Je peins les bords du socle et les petits bits supplémentaires, et le socle est prêt pour la résine.
Anamnesis studio

Using uv resin, I add a few droplets of magenta ink to tint the resin but keeping is transparent.
Apply the resin on the flat part and use a uv torch to dry it.
Je mélange une pointe d’encre magenta à ma résine uv pour la teinter légèrement et je la répartis sur les zones plates du socle. Je la fais durcir à l’aide d’une lampe uv.
Anamnesis studioAnamnesis studio

When I properly cured, gently drybrush pure white on the ice, to make it frosted.
Quand la résine est bien sèche, je fais un léger brossage à sec de blanc pour créer l’effet de givre qui donne de la profondeur.
Anamnesis studio

You can leave it as it is, or you can add snow and a few tufts to finish it. I won’t go again on the process, but you can find all the step necessary here!
Vous pouvez laisser le socle comme ça ou ajouter de la neige ou même des touffes d'herbes, je ne décris pas le procéder plus en détail mais vous pouvez le retrouver ici !
  
Joyeuses fêtes à tous !
Cheers and happy holidays!
Anamnesis

21 Nov 2019

[Showcase] General hobby update and progress

As you may have noticed, the blog was a bit quiet for the last few weeks again, I had a few things planned but I wasn't really in writing mood.
Being frustrated with my Sylvaneth didn't help my hobby mojo either, but anyway you're not here to read my rambling.

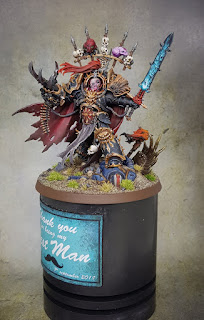
First thing first, here the special project I was working tirelessly before the wedding which was a gift for my best man.

Anamnesis studio
Anamnesis studio
Anamnesis studio
Anamnesis studio
Anamnesis studio
Anamnesis studio
Anamnesis studio
Anamnesis studio

This was a first time doing a label, interesting stuff... For the curious I've been following sprocket small world tutorial, feel free to check it out! Don't expect to see more chaos stuff, this was a one-off 💀
I admit, the kit is quite awesome and very well thought! I was a bit in a rush to paint this big guy, but I still tried to push the painting and respecting my best man painting scheme.

I also had some fun converting a chaplain for my blood angels, we don't really play 40k at the moment, as we are not big fan of the rule and we enjoy AoS more, but I still love my little red marine.
Anamnesis studio

Though the latest news is I acquired a few stormcast and being impressed/inspired/awed by Veillotron army on his twitter account, I wanted to do something similar for a long time.

Pulling inspiration from his conversion, the conversion on blog des kouzs and videogame like dark souls and diablo here the first guy on my version of the Anvil of the Heldenhammer.

Anamnesis studio
Anamnesis studio
Anamnesis studio
Anamnesis studio

The next tutorial in the making is quick one on painting freehand wood as you can see on the inside of the shield. The rest will probably follow as I had a few request on my Twitter or Instagram 😊

And that's all for today!
Until next time
Anamnesis

9 Oct 2018

[Tutorial] Snow and ice base

After a long wait, it's time for the tutorial on snow base.
I had quite a few people requesting it, though it took a bit of time to take all the picture necessary.
Nous y voici, le "fameux" tutoriel sur les socles enneigées. J'ai eu beaucoup de demande sur les socles de mes nighthaunt, vous retrouverez donc ci-dessous le pas-à-pas complet afin de pouvoir les reproduire!

It's not really long but you can't do it all in one go, you've been warned.
I split this between building the base and the painting, just to make it easier to follow.

Oh, and the pictures are not from the same base since I was a bit too eager on the first one and forgot to take picture, now you know.

Il y a beaucoup d'étapes mais ce n'est pas particulièrement long, garder juste en tête qu'il n'est pas possible de le faire en une session.

Vous remarquerez que les images ne sont pas toutes du même socle, c'est "normal", dans ma lancée, j'ai oublié de prendre les photos de la peinture de l'executioner, j'ai donc repris sur mon knight of shroud.


Part 1 - The build / La construction


You'll need/ Matériaux:

Sand paper (using 280 here), some textured paste like vallejo dark earth paste, pieces of slates or other rocky things and a base, obviously.
Papier de verre (j'utilise du 280), de la pâte texturé type vallejo dark earth paste, des morceaux d'ardoises ou autres morceaux de petits cailloux et un socle.

Nothing too fancy, it's quite basic but you can have some spare bits of your favourite enemy to add some dimension to the base, in this case, I'm using some spare skulls.
Rien de bien compliquer, mais il est toujours possible d'ajouter des petites pièces restantes de l'armée de votre adversaire préféré ou des crânes, c'est toujours bien un petit crâne.


Anamnesis studio
1. You need to sand your base to get rid of the textured surface, we want to have it smooth to apply the ice.
Commencer par poncer le socle pour avoir une surface lisse en préparation de la partie glacée.


Anamnesis studio
2. I added a piece of scenery to avoid the wobbling problem I had with the lord executioner.
If you want to add to plastic piece around, it's usually easier to glue them before adding the textured paste.
J'ajoute mes petits bits, dans ce cas pour éviter le syndrome de la gigote du lord executioner, c'est en général le bon moment pour coller pièces plastiques avant d'ajouter la pâte texturée.


Anamnesis studio
I'm a bad photograph...


3. Time to take the sandy paste and apply it liberally, I avoid the front and leave the base bare where I want to add some ice. Try to add some volume to the sand to make it more interesting.
C'est le moment mettre la pâte texturée sur le socle, j'ai évité la partie frontale en la laissant libre pour pouvoir y mettre la glace. J'essai également de créer des volumes avec la pâte afin de donner de l'intérêt.


Anamnesis studio
4. Before the paste is dry, I sprinkle some pieces of slate on it. To fix the piece, I used a few drops of terrain fixer from scale 75, if you don't have it, just use diluted pva glue.
Avant que la pâte soit sèche, parsemer la zone texturé avec des petits morceaux d'ardoises. Je fixe ces morceaux avec quelques gouttes de terrain fixer scale 75, si vous n'en avez pas, un peu de pva dilué suffit. 

And where done with this part. 
Really quick, which was the idea considering how many miniatures you need in a nighthaunt army! 
Just remember to do the step 4 after applying the paste and not applying it to all the base otherwise it will dry on surface the slates will bounce off.
Et c'est étape est finie, le but étant d'avoir des socles faciles à faire pour mes nighthaunt vu le nombre de figurines nécessaires.
Pensez juste à faire l'étape 4 juste après avoir appliqué la pâte texturé, plutôt que de faire l'ensemble des socles, sinon elle va sécher en surface et les morceaux d'ardoises ne colleront pas.


Part 2- Painting / La peinture


Paints and products / Peintures et produis utilisées:


Anamnesis studio
Dark sea blue (vallejo), Sotek green (gw), Caribbean blue (s75), miskatonic grey (s75), white (I'm using schminck, but any one will do), blue marine ink (missing from the picture)
Optional / optionnel: Violet ink, green ink, magenta (vallejo)

Krycell fine snow, krycell adhesive, krycell snow wash and tim holtz distress crackle paint clear 
Optional / optionnel: mininatur blossom stripes magenta
For a complete review of krycell products, see my last article here
Pour un test complet des produits krycell, je vous renvoi sur mon dernier article ici


Anamnesis studio
1. Paint the whole base with dark sea blue
Peigner l'entièreté de la base avec du dark sea blue


Anamnesis studio
2. Start by dry brushing the sandy part with sotek green.
Brosser à sec les parties sablées avec du sotek green.


Anamnesis studio
3. Next, I used an old brush to do the icy part, using sotek green, I dab my brush like a sponge. Here is a little video showing the process. If you colour the sand a bit, it will be corrected in the next step.
Repeat this process using caribbean blue, try to be random, the point is to see the different layer to build depth.
(No pictures or the blue because between my eagerness and trying to take a decent shot of this, I forgot this step and had to go back after the white...)
J'utilise un vieux pinceau pour faire les parties glacées, je tamponne gentiment mon pinceau avec du sotek green sur les parties lisses du socle, puis avec caribbean blue en gardant une certaine visibilité des couches précédentes par transparence. 
Le procédé en vidéo cette fois! La deuxième photo est manquante car entre la tentative de vidéo et mon élan, je l'ai oublié et j'ai dû reprendre la glace.
That's mostly a test, I hope it's working - Speed x2


Anamnesis studio
5. Drybrush the sandy part again using miskatonic grey, but lighter than in step 2. 
Brosser à sec la partie texturé avec du miskatonic grey, mais plus léger que l'étape 2.


Anamnesis studio
6. Finish the icy part, dabbing some white.
Pour finir la glace, répéter le point 4 avec du blanc.


Anamnesis studio
7. Optional step, I add some light patchy glaze of ink, changing between green, violent and magenta on the sandy part to break the surface. 
Optionnel, j'ajoute des petits glacis par patch avec l'encre pour créer de l'intérêt, avec du vert, du violet et du magenta sur les parties texturées uniquement.


Anamnesis studio
8. Last step is to do some light glaze of green ink on the icy part to add some depth since we will add a transparent layer on top. It's also time to paint all the little bits and pieces you may have added on your base.
That's usually where I finish the mini and varnish it before doing the next step.
C'est le moment de faire des glacis sur la partie glacée avec du vert pour nuancer cette espace, ce travail étant visible avec la couche transparente qui viendras par-dessus. 
Si vous avez des petits bits, c'est un bon moment pour les peindre.
A cette étape, je fini de peindre la figurine et la vernis avant de passer aux étapes suivantes.

9. Fun part is now to put the distress crackle paint on the icy part, to be afraid to overlaps a bit the sandy part. The thicker the paint, the bigger the cracks and vice-versa. 
It's up to your preference really, I still suggest doing a few try on a piece of cardboard first. Leave it to dry thoroughly before the next step! #missingpicagain
Pour la partie amusante, c'est le moment d'appliquer le vernis à craquelé distress sur les parties de glace, n'hésitez pas à dépasser un petit peu sur la partie texturé pour ajouter du réalisme. Plus la couche est épaisse, plus les craquelures seront grosses et vice-versa.
A vous de choisir quel effet vous préférez, je recommande néanmoins un petit test préalable pour voir comment réagis le vernis. 
Laisser bien sécher avant l'étape suivante!


Anamnesis studio
10. A light wash of marine blue ink on the ice specially on the cracks will give this iceberg effect. Just be subtle you don't want the whole ice turning blue though.
Un wash de marine blue ink sur la glace lui donne un aspect digne d'un iceberg, bien se concentrer sur les craquelures afin de colorer les tranches du vernis. Vous avez meilleurs d'y aller léger afin de pas rendre la glace trop bleue.


Anamnesis studio
11. Final step for the ice is to drybrush some white on the ice to give the frosted look, then  apply a snow wash on the sandy part next, just remember to shake it properly!
La dernière étape sur la glace est de faire un brossage à sec de blanc pour lui donner cette aspect givré et d'appliquer le snow wash sur la partie texturée, penser à bien secouer le pot!


Anamnesis studio
12. I added some magenta flowers on the earth, to give some contrast to the gheist on top.
J'ajoute des fleurs mininatur magenta pour finir sur les zones de terre afin de contraster avec les fantômes.


Anamnesis studio
13. Final step, it's time to add the snow, I'm mixing krycell adhesive with their fine snow to make something similar to dental paste, apply it liberally on the base, trying to make some volume with the paste. I also add some snow spots on the ice, it's a nice way to cover mistakes.
C'est finalement le moment d'ajouter la neige, je mélange ma neige krycell avec la colle krycell jusqu'à obtenir un mélange proche du dentifrice en consistance. Je répartie cette pâte sur le socle, j'essaie également de faire des petits monticules pour donner du volume. Je n'oublie pas de faire des petits tas sur la partie glacée, c'est un bon moyen de cacher les éventuelles erreurs.

And you're done! The finished mini will be presented along his friends in the next article.
Et c'est fini! La figurine finie sera présentée avec ces potes dans le prochain article.

Anamnesis