Showing posts with label NMM. Show all posts

10 Oct 2019

[Showcase] Sylvaneth Tree revenants

Alright wedding done, honeymoon was a treat, we can now go back to regular schedule after the craziness of the last few months.

There're still a few things I've finished and need to show but let's start first with a unit I was really looking forward to paint!

The "mighty" tree revenants! Mighty being a strong word since they do tend to die to a stiff breeze on the battlefield.

I started with a quick squad of fives, the point was to find a good balance between speed and result.
You can imagine, I was really dreading the blade as that's usually the longest part to paint.

The squad in all its glory
The skin recipe was tweaked on them since I didn't really have the time to think too much about it on the Arch revenant with the deadline for everchosen. 
I was supposed to do a tutorial on the skin, but I admit, I totally forgot this, soooo, next time?

The leader

Happy piper

George the standard bearer


Seeing the result, I'm really happy with the result, the standard is probably the coolest NMM I've done so far, but I really need to think twice if I want a second unit 😅

I still thinking about highlighting the black, but I'm not sure if it's worth it.

Expect a few more showcase next!

Happy painting !
Anamnesis

20 Aug 2019

[Showcase] Everchosen Sylvaneth Arch revenant

Soooo it's been some time since the last article, it has been a rollercoaster of adventure with my everchosen entry and time for writing between the competition and preparation for the wedding was pretty low.

To make it quick:
  • my entry was at first, not valid for the competition,
  • then it was valid again
  • my store decided not to participate two days prior to the deadline because gw left them in the dark with no news whatsoever
  • decided to participate in another store 2h away from home
  • had like two days to finish the mini including the whole bug and the base
  • and to finish it I did drop the mini just before taking photo and it broke in four pieces, that at 1am
So, as I said, not a smooth ride.

But in the end, the mini was finished even if a few parts are clearly rushed and I even managed to win my category on the shop. Thanks again l’Ornithorynque in Neuchatel for accepting me!

I really tried to push myself on this mini, the NMM is probably the most advanced I ever done, the wood veins were drawn all over the place and I even had to sculpt a few pieces to accommodate for the modified pose.

It really is a great model and to be frank, I’m very unhappy with the rushed end, you can clearly see those parts are not on pare with the rest of the model and it bother me to no end.

Starting from massive spike of motivation to finish in frustration, I’m not sure I’ll do anything similar anytime soon.

But enough ramble here are the pictures!

If you enjoy my piece, feel free to vote for it on the Warhammer community website, displayed pictures are random but you may stumble on mine 😊 

Winning entry!

Anamnesis studio

Close-up and different angles

Anamnesis studio
Anamnesis studio
Anamnesis studio
Anamnesis studio
Anamnesis studio
Anamnesis studio

As a small reminder, a full tutorial on the blade is available free on the blog and you can find the step by step for the base, bark and leaves also in their respective links !

Cheers !

Anamnesis

10 Jul 2019

[Tutorial] NNM magical blade


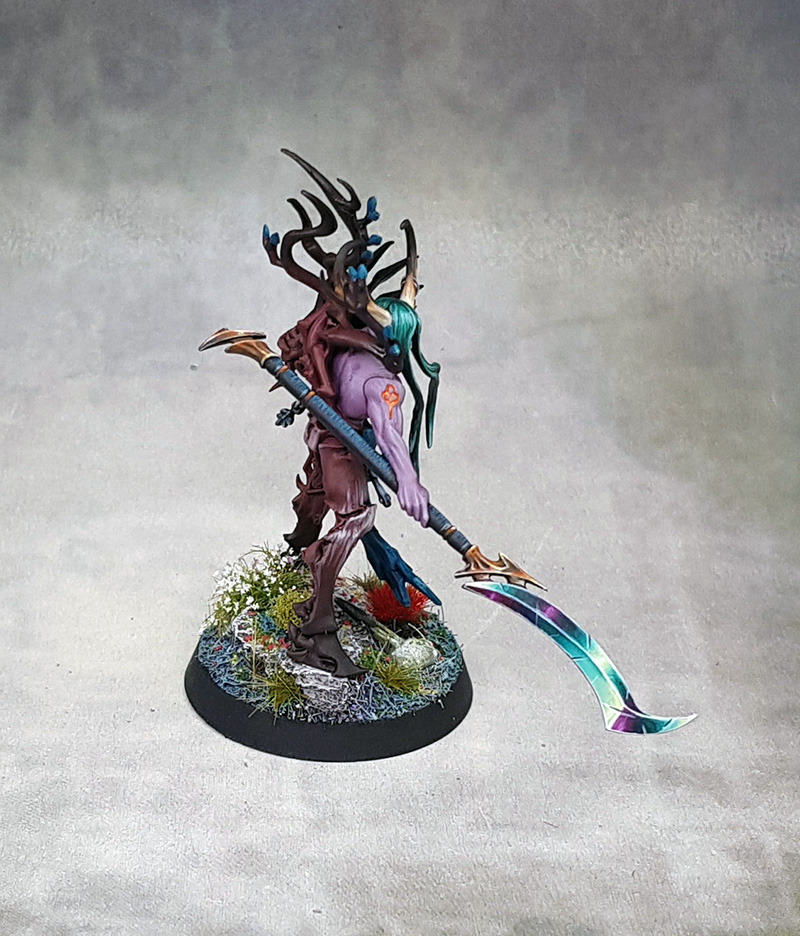
So, following the pictures posted on social media, I had a few people requesting a tutorial for my magical blade on my arch revenant.
Following the waves of the crowd (keep dreaming dude...) I took all the pictures needed on the second side, woohoo!
Keep in mind, the point is not to make a very realistic metal, but a magical fantasy blade.

Bon après, les retours positifs et les requêtes sur les réseaux sociaux, voici le tutoriel sur le glaive en non métallique sur mon arch revenant ayant profité du deuxième coté pour faire les photos qui vont bien !
Garder en tête que l’objectif n’était pas de faire un métal réaliste mais bien une arme fantaisiste. 

Objective - Objectif:
anamnesis studio

Disclaimer: This tutorial is the first with this kind of technique and I wouldn't dare to say I have mastered it, it's still the second time ever I tried it, so it is far from perfect, but it should give you an idea of the process and how to do it.

Avertissement : Ce tuto est le premier sur ce type de technique et je ne prétends pas qu’il soit parfait, loin de là, cependant cela vous donne une idée du procédé, n’hésitez pas à l’adapter selon vos besoins ou votre niveau.
Sans plus attendre, on attaque !


Without further ado, let's dig in !


Paint used - Peintures utilisées

anamnesis studio 
Scale 75
Hastur purple
Despair green
Caribbean blue
Hykey yellow

Kimera kolors
Violet
Magenta
Carbon black
Schmincke primacryl titanium white


anamnesis studio
1. Give a nice and smooth basecoat of Caribbean blue. I find easier to start on a light basecoat and shade it than the opposite in this case.
Première étape, on prépare une jolie couche de fond avec du caribbean blue bien propre. Je préfère partir sur une base claire qui me semble plus facile pour travailler dans ce cas.

anamnesis studio
2. I sketch my light using hikey yellow drawing fine line following the sense of the blade. On the big flat base, I try to do one big highlight and a second smaller one next to it. 
I alternate the light on the different surface of the blade, the effect works best when you have light and shadow next to each other.
J’esquisse rapidement mes lumières avec du hikey yellow en traçant des fines lignes dans le sens de la lame. Afin de donner plus de réflexion à la surface, je fais un éclaircissement principale large et un petit adjacent plus fin. J’alterne les zones de lumière et d’ombre afin de bien délimiter ces surfaces.

anamnesis studio
3. Next it's time to roughly block the shadow using hastur purple, on the opposite part of the light and in between them to create a play between light and shadow. The consistence is a bit more diluted than a basecoat but not as light as a glaze, we will refine the transition later.
Je bloque rapidement mes ombres avec du hastur purple bien dilué à l’opposé des zones de lumière afin de créer ce jeu d’ombre-lumière qui va donner l’effet métallique à la fin. Le but est de vérifier que les alternances fonctionnent avant de travailler plus détails l’effet.

anamnesis studio
4. Seeing that the alternate colours are working, I deepen the shadow with hastur purple pulling my paint toward the darkest point. I started smoothing the transition using despair green diluted to draw fine line between the caribbean blue and hastur purple.
Etant content avec mon esquisse, je renforce les ombres avec du hastur purple toujours en tirant ma peinture vers la zone que je souhaite plus sombre. Avec du despair green bien dilué je commence à travailler gentiment ma transition entre l’hastur et le bleu en traçant de fines lignes.

anamnesis studio
5. Second pass of fine line with despair green, some are longer to give a sense of movement to the sharpness of the blade.
Then glaze the transition from despair to hastur purple with despair green pulling the paint from light to the darkest point.
Deuxième passage de despair green avec de nouveau des lignes, je fais attention à ne pas les faire toute la même taille afin de créer de la variété. Je profite aussi de ce moment pour faire des glacis de despair green entre le hastur purple et mes lignes pour affiner le passage d’une couleur à l’autre.

anamnesis studio
6. Added some line with caribbean blue for the transition from despair to caribbean, doing some of them longer like before.
Je reprends un peu mes lumières en traçant des lignes de caribbean bleu entre la zone despair green et hikey yellow en tirant certaines un peu plus loin comme précédemment.

anamnesis studio
7. With a mix of hikey yellow and white diluted, I follow the edge of the different surface to make them stand out. My line is a bit thick, I took a brush too big, but we'll be able to correct on the next step.
Avec un mélange d’hikey yellow et blanc dilué, je viens marquer toutes les arêtes pour les faire ressortir. J’ai été un peu fort sur le trait, je corrigerai ceci dans la prochaine étape.

anamnesis studio
8. Refine the edge highlight with a second pass, I took the time to smooth the line going back with the appropriate colour to correct and refine it. We're starting to see something!
J’affine les arêtes avec un deuxième passage et j’en profite pour reprendre mon trait grossier en corrigeant avec les couleurs adjacentes nécessaires. L’effet commence gentiment à venir.

anamnesis studio
9. To reinforce the light point, I took my hikey and white mix and draw very fine line in the middle of the strong line.
Je renforce les points de lumière avec le mélange de jaune et blanc et trace de très fines lignes au milieu de mes points de lumières principaux.

anamnesis studio
10. To soften the white edge highlight, I lightly glaze hastur purple and caribbean blue on the edge following the colour on the blade. I went a bit too far around the hand as you can see.
Afin d’atténuer les arêtes trop blanches, particulièrement dans les zones plus sombres, je fais des glacis d’hastur purple et caribbean blue selon les zones concernées. J’ai été un peu fort sur la partie haut du glaive, bien visible sur la photo en gros plan.

anamnesis studio
11. To give some reflection in the shadow, I sketch some light using magenta and white under or over the main light point. This will give some interest in the shadow and give an idea of the reflective capabilities of the material.
Pour égayer les zones d’ombres et apporter une certaine brillance à mon arme, je viens faire des points de lumières dans les zones d’ombre avec du magenta mélangé avec du blanc en suivant mon point de lumière sur la surface opposée. 

anamnesis studio
12. Smooth the previous sketch with magenta diluted, pulling toward the dark part. You may need a few passes.
J’affine la transition avec des glacis de magenta dilué que je tire vers la zone sombre en plusieurs fois.

anamnesis studio
13. Time for the light point! Using diluted pure white I trace a very fine line in the middle, add a bigger point next to the edge where the light would catch on.
C’est le moment des points de lumière finaux. Avec du blanc dilué, je reviens sur mes zones de reflets en traçant une ligne fine au milieu de l’éclaircissement, j’ajoute un point plus gros sur la partie directement à côté de l’arête.

anamnesis studio
14. That's purely optional but I like to add scratches on my nmm to give it a more "realistic" look. Using a mix of purple and black I draw some lines around the edge where scratches would come.
Ces étapes sont purement optionnelles mais j’aime ajouter des égratignures afin de leur donner un effet d’usure. Avec un mélange de violet et noir, je réalise des traces réparties sur les zones qui s’abime.

anamnesis studio
15. To finish the scratches, underlines the dark line with pure white, pulling the line a bit further than the black to give it some definition. I also add some lines just of white to do lighter scratches.
Pour finir, je viens souligner mes lignes sombres avec du blanc pure, en tirant la ligne un peu plus loin que celle de noir afin de donner l’impression de profondeur. Je fais des marques plus claires avec simplement des lignes de blanc.

And there you go, full step by step of my magical blade, hope you enjoyed this read and feel free to comment down below!
Et voilà, un tuto de plus ! J’espère que vous le trouverez utile et n’hésitez pas à commenter ci-dessous !

This paintjob is a bit more elaborate than before, the idea was to present this piece to the everchosen competition but apparently, it's not a valid mini. I'm waiting on clarification on this, but I'm a bit saddened by this decision.
J’avais prévu d’entrer cette pièce pour la compétition everchosen, c’est pour que ça que j’ai poussé le schéma et mes techniques, mais ce n’est apparemment pas une figurine autorisée, j’attends une prise de position de gw là-dessus mais je dois avouer être un peu déçu.

Anyway, see you soon and as a preview, I'll do a tutorial on the purpl-ish skin also.
Je vous dis à bientôt et le prochain tuto devrait concerner la peau violacée sur mes sylvaneth.

Thanks for reading thus far!
Merci d’avoir lu jusque-là !

Anamnesis

28 Jun 2019

[Showcase] Starting Sylvaneth - Dryads and Branchwych

Hello dear readers!

Busy month and heat mean it has been some time since the last article, but here I am again!
I was planning to redo the design of the blog, but it will come later.

Since I've sold my nighthaunt, I needed a new army for AoS.
I love the sylvaneth aesthetic and the new battle tome announcement plus the arch revenant miniature just convinced me if I ever needed any help. (N.B., I don’t) 

As side note, my mate confidence on painting an army has been boosted with contrast paint, so the new challenge is to finish 1000 points each for age of Sigmar by the end of the year!
Expect to see NMM for this army to keep the organic feel, I’m no Lan, but I’ll try to my best to have a convincing effect.

You saw the first few dryads for testing the scheme on my last two tutorials, the process is still in evolution but it’s getting better and faster.

Here is the complet squad for my first entry! 30 are still waiting to be build… few.

Anamnesis studio
Anamnesis studio
Anamnesis studio

And the old batch

Anamnesis studio
Anamnesis studio
Anamnesis studio

Even with the kit being a few years old, I still really enjoy painting them. Cleaning them is another story, removing the mould lines on the branches is a right pain. 
You can play "Spot the difference" between the fresh batch and the last one if you're bored, a few things are different.

Lady of the wood


I started the branchwych after the first 5 dryads, choosing to complement my painting scheme proved to be a difficult task to say the least and I’m still fiddling with it. Many things had to be repainted a few times to find something I was happy with. 

I tried to include as many nuances as possible in the blade, to have something magical.
To differentiate the hand of the blade, I painted a softer wood like birch with a warmer tone, which contrast with the black “hands”. Fuchsia was used for the hair just because the paint is really nice, simple choice!
I made a tiny waterfall on the base to see how it worked after seeing something similar on Instagram, inspiration is everywhere!

Anamnesis studio
Anamnesis studio
Anamnesis studio
Anamnesis studio
Anamnesis studio
Anamnesis studio

Not everything worked as I thought but the mini is finished! Mainly, the spite is a bit rough.

Hope you stay with me on the road to painting 1000 points of sylvaneth since it's already mid-year and I need to move quickly now!

So, what’s next in the pipeline?
A tutorial on the blade will be made as requested on social media.
I’m also planning on entering the Everchosen competition with my Arch revenant, an article about painting for “competition” standard and my train of thoughts on the subject will probably be written.
As always, if you have any subject you would like to see, feel free to write them in comment!

Thanks for visiting the blog even with no new article and see you soon-ish!

Anamnesis

10 Sept 2018

Shadespire Severin steelheart warband

I never presented the full warband for Warhammer underworld after the tutorials, let's correct this! 

You can find full step by step on the painting process in my previous articles:

I’ve been hooked by Shadespire, it’s pretty new, small and easy to play but hard to master, I’ve played more shadespire than 40k and AoS in the last year, soooo easy to set up it’s a joy! 

Since the numbers of bands is limited, I wanted to convert my team to be able to recognise them at first sight. The models are push fit, but it doesn’t mean you can’t convert them. Cutting the little tab is an easy way to move bits around just like changing a weapon.

A small number of model also mean I can try to push my painting since it’s “just” 3 miniatures, little I knew it would take me 3 months to finish this project! 


I decided to paint them using non-metallic metal, I really like this technique, but I can’t see myself using it on a full-scale army, so a team of 3 members is the perfect opportunity to try it! 

My first victim was Oberyn, I quite like the miniature with his stern look, the giant hammer is carrying around mean he’s not joking around. To emphasize this effect, I choose to cut the parchment flying from the head of the weapon and made him look in the same direction as the head of the hammer and slowly down to give him the expression of a monster ready to smash the vermin crawling at his feet. 

I choose the colour to keep in line with the blue-green atmosphere you find in almost every artwork of Shadespire, which are mostly cold colours and give this impression of a depressing environment (A accurate description of this city), but to give it more interest and contrast I painted a strong copper and applied some orange rust to break the armour panels. 
Warhammer Underworld Shadespire
Excuse the white font, I forgot to take a pic on the black one
All the recess of the blue armour has been glazed with a deep red to give a deeper contrast, I tried to apply different kind of textures on the materials, the leather and clothes use the stippling method as opposed to the smooth blending of the armour to help differentiate them.

The weapon were painted jade to make them look like the shadeglass weapon on the cards.Every part has been weathered to represent the rigour of battle, with scratches and tears. A simple black line underlined with your highlight colour will do the trick (you can find more details in part 2 of my tutorial). 

The miniatures are quite dark, I choose to paint the pavement in a lighter tone to make the miniature stand out on a white stone floor, I used a sponge to paint all the stone and applied a few glazes of the different colours found on the mini to link them together. The leaves are crimson red to represent the flora responding to the blood spilled in everyday battle around the city.

I choose to replace completely the second member, I find Angharad a bit bland and I was already looking for an excuse to paint Neave Blacktalon. Using her as a base, I cut the arm to reposition the axe and use the original shield on the front hand, the spikes on the collar have been also cut out to make her less ornamented, but I’ve kept the original base, I just had to plug the front hole since I’m not using it.

Warhammer Underworld Shadespire
Many shot for my favorite mini of the team :p
Female faces are a very good exercise to be gentle with your contrast, I choose to give here red hair to contrast with the amour. One thing associated with red hair is freckles, I attempted to represent them on the face which was quite a challenge at that scale. 
A little blue make-up to finish her eyes and she was ready for action!

Two members being done, we’re left with the leader, Severin Steelheart himself. The first thing I’ve done was cutting the head off, I wanted a head a bit more savage looking, quite similar to a Viking like Neave. I’ve used a marauder horseman head with a mohawk and found it was enough to make him different (and it’s a bit more work to modify him). I’ve also painted him in sub-assemblies to facilitate the painting of the sword and cloak principally.

Warhammer Underworld Shadespire

The miniature has been painted in the same way as the previous ones with more cooper to make him stand out, the cloak was a fun exercise in stippling, spoiler it cost me one brush!
Quick tip, don’t use your best brush for stippling, it is quite hard on the brush’s hairs.

The flesh tone of his face is much darker than Angharad and you can clearly see the difference in contrast, I’ve used some desaturated brown to give this colder effect, a little stubble using some glaze of dark sea blue complete the rugged look.


The full team

Warhammer underworld Shadespire


Hope you enjoy this article and the blog, I'm happy to report we passed 10'000 visit and coming close to 15'000 !
Thank you very much for your interest and let me know if there is a subject you'd be interested in?

Anamnesis