31 Aug 2018

[Tutorial/Showcase] Primaris Aggressor - Red tutorial

Following last week article, it's time to present my latest unit for my primaris army which clock them just under 1000points!

Doesn't seem much but I never add more than a squad and half painted for each army for many years, so it's quite a milestone for me :)

A few pointers concerning the kit, it's possible to build them almost completely and keep the head separate for ease of painting, you just need to cut the little peg under the head, so you can tuck them in their little hood.

Keep the ammunition feed in two pieces was a mistake, glue both side and then glue them in, I didn't glue to backpack to make it easier to paint.

Apart from theses littles things, the kit is really nice with a few options, cleaning the mould line on all the cables was a massive pain though.

Without further ado, here is the result!

[Français] Et voilà, la finalisation de mes 1000pts de primaris (à 25pts près), la dernière escouade en date avec ces aggressors qui représente la garde rapprochée de mon capitaine et qui l'accompagne dans le repulsor. 

Jolie kit avec un certain nombres d'options; pour ceux qui se demandent, il est possible de monter l'ensemble de l'armure et de garder la tête à part, il suffit de couper le petit pivot sous la tête, il est possible de la glisser dans la zone réservée après peinture.
Évitez de garder les chaines de munitions en deux parties, c'est une erreur que j'ai fait ce qui a rendu le collage final plus qu'ennuyeux....

Knight of the Chalice aggressors squad


Space marines primaris aggressors

Before painting to give you an idea of the different parts, no heads, no backpacks.

Space marines primaris aggressors
Oh, if you're wondering why I have squad of 4, I had a pretty big miscast on my original box and gw was kind enough to send me a new one, kudos to them!

Red Tutorial - Tuto sur le rouge

Quite a few people asked me about my recipe for the red, when I choose my scheme, the idea was to have very simple steps to paint it so I could do a whole army this way. 
I put theses littles pictures together to show the process, I don't think the tutorial need to be as precise as the other ones since there's nothing much to it really.

Bon nombres de personnes m'ont demandés la recette pour le rouge, l'idée de base de cette armée était de pouvoir réaliser la couche de base à grande échelle et de façon rapide afin d'imaginer avoir une armée peinte un jour, voici donc un petit tuto rapide sur la façon de procéder pour avoir ce rouge bien flashy. (Pour être honnête, il a été fait avec les images à disposition, il n'est pas forcement aussi bien ficeler que les autres)

Space marines primaris aggressors
1. The first step and what I usually do with all my minis is prime them with chaos black, which is thus far the best basecoat spray for me. 
I will use preshading on this mini, this technique can be quite helpful to make the volume pop and give you a rough idea on where to put your highlight.
Give it a zenithal spray with white, to make it more interesting, I also spray with a 30° angle from the top, otherwise the legs will never receive any highlight from the white.

You can use a rattle can or an airbrush, all my intercessor where done using a rattle can and I used the airbrush for my lieutenant and captain, it's really up to you.

La 1ère étape consiste à sous-coucher la figurine en noir, j'utilise le spray gw qui reste pour moi la référence parmi les différents produits testés.

Pour ces figurines, j'utilise la technique du "preshading" (pré assombrissement pour les bons francophones mais ce n'est pas terrible comme termes...), cela consiste à sous-coucher une figurine en noir et appliquer un voile blanc en deuxième couche pour marquer les volumes.

Cette couche pour être appliqué au spray ou à l’aérographe à choix, le résultat à l'aéro sera un peu plus fin mais rien de transcendant non plus, pour référence, les intercessors sont fait à la bombe et les lieutenants et capitaine à l'aéro.
J'applique cette couche de façon zénithal en ajoutant un petit angle de maximum 30° pour donner plus d'intérêt et une meilleure lecture. Petit effet artistique, sinon la tête sera blanche et les jambes noires.

Space marines primaris aggressors
2. For the second step, I use an airbrush to spray the armour with daler & rowney flame red ink which is an acrylic ink. I don't even dilute it, to give you an idea of my laziness...
You just need to give it a few light coats to keep the transition you have between the black and white, the white undercoat will make the red pop. 

You don't need an airbrush for the step, it just faster to do it this way, if you want to do the same thing by hand, you need to do a few diluted coats to keep the original contrast.

Keep in mind that red is heavily dependent on the colour next to it, if you have really bright colours adjacent, it will make it less vibrant.
If everything went correctly, you should have a nice subtle gradient on the red. It's really shiny for the moment but the varnish at end will dull the effect.

La seconde étape, j'utilise l'aérographe pour faire de couches délicates de rouge avec de l'encre acrylique daler & rowner flame red ink, je suis tellement une flemme que je ne la dilue même pas...

L'idée est de faire plusieurs couches fines pour laisser apparaître les transitions et donner un effet de dégradé sans passer des heures à le faire manuellement.
L'aérographe n'est pas une nécessité mais il simplifie le procédé, si vous souhaitez le faire au pinceau, le plus simple est de faire de fines couches diluées jusqu'à atteindre la couleur voulue.

Il intéressant de garder en tête que le rouge est également dépendant des couleurs adjacentes, s'il est entouré de couleurs criardes, celui-ci va se "perdre" dans la masse, entouré de couleurs plus neutre, il va ressortir.
Le résultat est très brillant pour le moment, mais cet effet sera atténué par l'étape final de vernis.

Space marines primaris aggressors
3. To make it easier to read, I painted all the black part in... black (badum); I also use a mix of red ink and black ink to mark all the joints and creases in the armour, the ink being more fluid make it easier to apply.
Easy step, just take your time to not make some marks on the red.

Pour faciliter la lecture et la peinture, je peins tous les parties qui seront noirs en... noir (tadaa); j'utilise un mélange d'encre rouge et d'encre noir pour marquer les creux et joints de l'armure, la fluidité de l'encre facilite cette application.
Prenez votre temps pour cette étape afin de ne pas dépasser sur les parties rouges.

Space marines primaris aggressors
4. Last step is to highlight the edges of the armour panels following the zenithal highlight, I am using a mix of 50/50 red ink and white, that part can be a bit tedious but It really make the armour pop.
Sometimes I do this step in two passes, adding more white and doing smaller line to finish it.
If the transition is to strong, just glaze some red ink to smooth it out.

And boom, flashy red is done!

Les dernières étapes consistent à éclaircir les arêtes de l'armure en suivant la lumière zénithale, j'utilise un mix de 50/50 encre rouge et blanc.
Je fais parfois cette étape en deux fois, si mon mélange est trop foncé, j'ajoute simplement un peu plus de blanc et reprend des éclaircissements plus fins. Si la transition est trop violente ou le mélange trop clair, je fais des petits glacis d'encre rouge pour affiner la transition. C'est probablement l'étape la plus longue, mais c'est celle qui va donner la définition de l'armure et ces contours.

Et voilà, un rouge bien flashy en 4 étapes !

Plusieurs articles sont prévus sur des tests de matos, des présentations (des nighthaunts!) et d'autres tutos, il faut juste que je trouve du temps pour les écrire, ceci me prenant un peu plus temps que ce que j'envisageais à la base. 
N'hésitez pas à me faire part de vos retours et de choses que vous souhaitez discuter !

I have quite a few things planned for the next few articles, showcase (expect to see some nighthaunts!), review and some tutorials, I just need to find the time to write everything, since theses articles take quite some time to write!

Cheers
Anamnesis

21 Aug 2018

Primaris Knight of the Chalice - Repulsor tank

It's been quite some times since the last article, I had planned to post it sooner but between life, being sick for few days, the heat and the release of battle for azeroth, I admit the hobby has been side tracked a bit.

Being level max and not much interest past the actual storylines mean I can go back to my miniatures!

Repulsor - Pride of the second company, terror of the battlefield and personnal ride for Captain Beshop


The tank was finished a few weeks ago, but I never posted the picture here.
Let's correct this.

The mighty repulsor, also called "wait, where is my check list for the weapons"!

I wasn't totally convinced when this kit was released but I admit it grow on me.

I still made some minor converting, specificaly on the turret, which was too clustered for my taste.
I put the rocket launcher on the front panel instead of the turret and cut the little peg to hold them, I'm no genious since I saw this modification on instagram, being honest...

A few fun effects were tested; on the gatling canon trying to represent the heat bloom, I used the new head from the blood angels primaris upgrade sprue also.
Big panels mean I had to add some shading on the red to make it pop, I use some purple ink to give it more depth.

Also special chapter mean no decals, so enjoy the freehand, the one on the back door was quite challenging to do :)

Space marines primaris repulsor
Close up on the pilot

You can also enjoy the fact that my lightbox is too small for this beast.

Next articles, I'll present my aggressor which ride on the repulsor with my captain, and normally a quick tutorial on the red!

Cheers,
Anamnesis

26 Jul 2018

Primaris Knight of the Chalice - HQ

Back from holidays, time to present you the pride and joy of my legion and reaper of glorious deeds on the battlefield, the HQ!

You have to use your imagination and please don't think they eat the dust almost every game, no for real 😅

Captain Beshop in gravis armour


Let's start with the captain in gravis armour, who's also my chapter master, leader of the host of angels, Captain Beshop of the 2nd company!

The conversion is based on the gravis captain from dark imperium, to make him more impressiv and follow the little fluff we have in the blood angels codex, I added some wings and an axe from the sanguinary guard kit and a reaver head.

The result is an imposing warrior which exult aggression (I think so though, feel free to disagree, mistakes are human 😝).

Knight of the Chalice


The painting is the same as the first few intercessors, I just took more times for the details and stuff considering his rank.

I had a blast painting the power weapon, choosing a greenish-blue to contrast with the red of the armour and adding small blue lightning around the energy cells to give a nice osl.

The basecoat is arphen jade scale 75 highlighted with emerald from vallejo then add some white, shaded with black only, all brush since I was too lazy to take out the airbrush again.
The lightning is painted with marine blue ink glaze and the lightning are drawn with white and blending in the basecoat with

If you look really closely, you should be able to see his red eyes representing him fighting the red thirst.

On the battlefield, I play him using the power axe profile, nobody mind since the axe is usually worst 
than the sword.

I present this guy first but, I painted him after the two lieutenants that follows.

Lieutenants with power sword and master bolter


Knight of the Chalice


Next are the lieutenant from dark imperium also, minor conversion for theses, I just added the little bling on the backpack to make them easier to see on the battlefield, we're no alpha legion, we don't hide !

Nothing special on them, I'll present how I paint my faces in another article though this one was really fun to do. I added a white stripe on them to represent their rank.

Really cool miniature considering it's a boxed set, the only thing I don't really like is the captain bolter gloves which look a bit bland considering the gauntlet of the aggressors squad.

Thanks for reading and see you next time!

Anamnesis

12 Jul 2018

Primaris Knight of the Chalice - Intercessors squad

Hello again,

You may have seen the tutorial to make the base but I didn't present the army on top of it.

Following the release of 8th edition of 40k and specifically the primaris marine, I've been totally hooked by the new kids on the block.

The sculpt are really simple, proportion are better, I'm just a fan.

I've been working on this army since september 2017, I'm closing on 1000 points at the time of this article.

I'll start with the mini that started it all, the free intercessor in the magazine "starting with 40k".


Knight of the Chalice


Knight of the Chalice

Knight of the Chalice

Knight of the Chalice


I painted this guy trying to find a scheme which would be easy to do and have a high contrast on the table top.
I've settled on the Knight of the Chalice chapter, a successor from the Blood Angels, the scheme is very similar to the horus heresy blood angels, red with black accent.

The little marine has been painted over 2 weeks trying to find the right balance between colours, textures and work involved to be able to produce an army for once and not just a few minis and being burnout. 
You can see the paint job is more than inspired by the artwork presenting the primaris chapter only on the warhammer community website.

For the base, I choose desaturate colours to contrast with the red of the marines, concrete environment with barbed wire and small rubbles to look like a true battlefield.
You can find the full tutorial here.


Knight of the Chalice


Knight of the Chalice


Knight of the Chalice
There is no such thing as friendly fire

Hot on the heels on the first marine, I did the rest of the squad to have a legal troop choice.
Here is the complete squad Heraeus, 5 more marines including the squad leader with bolter rifles.


Knight of the Chalice
The squad in it's full glory
Knight of the Chalice

Knight of the Chalice

Knight of the Chalice

Knight of the Chalice

Knight of the Chalice

Knight of the Chalice

Knight of the Chalice


Second troop choice is similar to the first one, also 5 marines with bolter rifle, this is squad Belamus. 

You can see I took some liberties with the squad marking to make them my own, I didn't like the multi-coloured knee cap.

Before the codex blood angels dropped, we didn't had choice of weapons for squad leader, but I'm planning on doing a third squad with a power weapon and assault bolt rifle. 

In the next article, I'll present my HQ choice including my lieutenants and captain.

Hope you enjoyed this little showcase and feel free to leave a comment below!

Cheers!

Anamnesis

29 Jun 2018

[Tuto] Making croncrete or industrial base

I took the opportunity when building my repuslor to took pictures of the making-of the base, so here it is!

J'ai profiter du montage de mon repulsor, pour faire un petit tuto sur ma façon de faire mes bases de types urbaines routes/bétons, rien de bien compliquer mais j'espère que ceci vous sera utile.
Building the base - La création du socle


1. Choose some cork to add some height to your base and use it as a base for the concrete, just keep in mind where the feets of your miniatures is supposed to go to have a nice surface to glue them. 
I also scored the plastic with a knife to give a stronger bond with the glue.

Choisir du liège afin de la découper grossièrement à la taille de votre socle en fonction de vos envies et/ou de la pose de votre figurine afin qu'elle puisse bien poser sur son socle.
J'ai marquer le plastique avec un cutter afin de donner plus de prise à la colle.


2. Cut some plasticard and glue it to your cork.

Couper une bout de carte plastique et le coller sur le liège de façon assez grossière.


3. Trim with a cutter the side of the plasticard to mostly match the cork underneath, make some marks and tears with a cutter or other pointy thing (mind your fingers please).

Utiliser votre cutter pour découper les bords de la carte plastique afin de l'ajuster au liège et en profiter pour faire des marques d'usures avec le cutter ou le une pointe quelconque.


4. This step is optionnal but finding a few bits and pieces to matches the idea behind your basework is nice and break the monotony of a plain base.

Ceci est optionnel mais ajouter des petits bouts de figurines ou des pièces afin de rendre le socle plus intéressant et de mieux définir l'univers dans lequel évolue votre figurine.


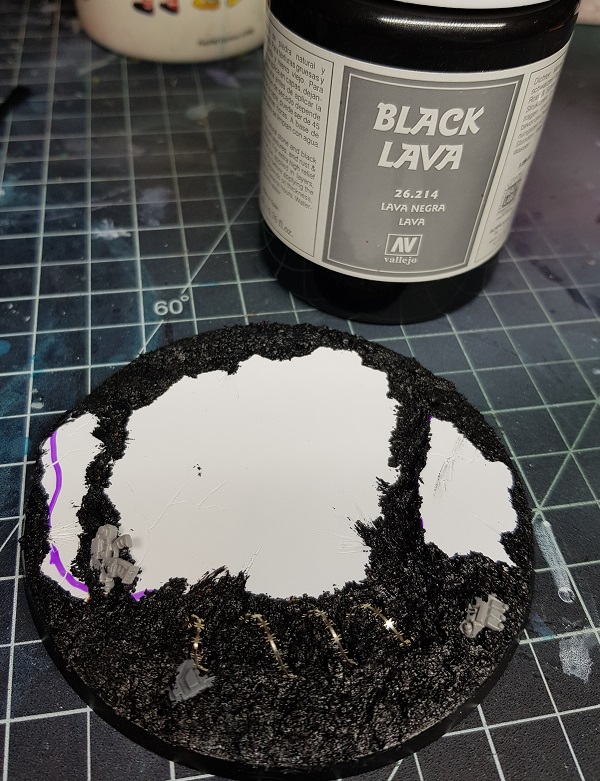
5. Drown everything in black lava putty from vallejo or any other pumice like stuff, and push your bits and pieces in it. I also added a piece of razor wires because I like it.

Noyer toute les parties adjacente avec la pâte black lava de vallejo ou similaire et pousser les petits bouts de décors supplémentaires dedans. J'en ai profiter pour rajouter du fil barbelé.


The painting - La peinture


1. Following the last photo dump on the making-of I just undercoat the base black.

Je pars donc d'une sous-couche noir sans surprise..


2. I sponge on the concrete vallejo dark sea blue randomly, then scalecolor bering blue using the samesponge.

J'utilise une éponge pour commencer mon béton que je trempe dans du vallejo dark sea blue, j'essuie le trop plein et je tamponne gentiment.
Je recommence sans nettoyer l'éponge avec du scalecolor(s75 pour la suite) bering blue.


3. Mix some white with your bering blue and continue sponging until you're satisfied with the effect Keep in mind we'll wash it after so it need to be quite light.

Je fini la route en rajouter environ 50% de blanc à mon bering blue pour finir le béton. Le résultat semble très claire mais l'ensemble du socle recevra un wash qui le rendra plus sombre et délavé.


4. Paint the sand with rhinox hide.

Je peins le sable entourant le béton avec du rhinox hide gw.


5. Drybrush scalecolor gobi brown, then vallejo yvory on the sand( forgot to take the picture of the yvory step, my bad).

Je brosse à sec le sable avec du s75 gobi brown puis du yvory vallejo pour finir (j'ai oublié la photo mea culpa).


6. Wash the whole base with army painter strong tone, make some pool on the concrete to mix it up, I add some pool of dark tone to mix things up too.

Je recouvre l'ensemble de la base de army painter strong tone (une sorte de devlan mud). 
Je m'amuse à faire des petites gouilles sur le béton pour simulé les traces d'eau avec le strong tone et j'ajoute un peu de dark tone (qui est du wash noir) pour faire des nuances sur la surface.


7. To decorate the base, I use some tamiya tape to mark the place i want for my yellow chevron. 
I use a sponge and masking fluid to make some marks so I can rub it off after painting; though don't be too generous with the masking fluid otherwise you won't see the chevron and just have a plain concrete!
I also paint the rime of the base in black.

Je peins le bord de mon socle en noir et je commence à délimiter le chevron et/ou bande jaune que je veux sur mon socle avec du scotch de masquage tamiya. Sur la photo, j'utilise également de la pâte de masquage pour protéger plus facilement et rapidement les objets en 3d du socle.
J'utilise une éponge trempé dans du liquide de masquage pour faire des petites marques dans mes lignes qui feront des traces d'usure ou il n'y aura pas de peinture.
Il ne faut pas être trop violent avec cette étape au risque de ne plus avoir de bande jaune mais juste un grand trou de la couleur du béton!


8. Using your sponge to lightly dab the place you've marked with scalecolor sahara yellow.

J'utilise mon petit bout d'éponge tremper dans du s75 sahara yellow et je tamponne gentiment ma surface pour faire mes chevrons.


9. Pull delicately the masking tape and enjoy the result. Use blue tac to rub off the leftover masking fluid.
Paint the little pieces drowned in the sand with vallejo armour brown to make them rusty.

Le moment sympa, on retire délicatement le scotch pour faire apparaître notre jolie marquage, une partie du liquide de masquage viendra probablement avec. 
J'utilise de la patafix pour décollé les derniers bouts de liquides restant, s'ils ne partent pas en tamponnant avec la patafix, vous pouvez utiliser la patafix comme une gomme en frottant légèrement mais il faut que la peinture soit totalement sèche.
J'en profite pour peindre mes petites ajouts dans les socles en vallejo armour brown vu que je veux leur donner un aspect rouillé.


10. Dab some kalahari orange then a brighter orange to make the rust on the pieces.

Je tamponne mes petits bouts de décors avec du s75 kalahara orange puis du fiery orange très légèrement pour finir.


11. Finish by lightly dabbing some metal paint to finish the effect. Clean any detail you need now.

Je fini l'effet de rouille en tamponnant avec du s75 black metal pour représenté le métal (oh surprise...), je profite également de ce moment pour reprendre mes imprécisions.


12. Time to add some effect with different kinds of pigments on the base, i'm using burnt umber, burnt sienna, green earth and some light rust.

Keep it in mind pigments are REALLY messy and hard to clean, to avoid that I put a sheet of tissue under my piece and when I’m finish I throw it away so the place stay more or less clean.

And we're done!

If you appreciate the content, feel free to leave a little something in the paypal coffee jar and share the knowledge it's free!

Je fini les bases avec des pigments de différentes couleurs pour casser la monotonie de l'ensemble et apporter un effet différent.

J'utilise: Burnt umber, burnt sienna, light rust et green earth; je les mélange joyeusement sur le socle et je souffle l'excédent (attention ça pars partout, appliquer de petite quantité à la fois!).

Cette étape est un moyen magique de mettre le grand chaos sur son établi, une petite astuce est de mettre un petit sopalin sous le socle lors de l'utilisation des pigments et une fois fini, on jette le tout et la place de travail reste propre!

Et voila!

Si vous avez apprécié le contenu, n’hésitez pas à me soutenir via le lien paypal coffe jar dans la colonne latérale et à partager les lien, c'est gratuit!


Anamnesis