10 Jun 2020

Adepta Sororitas - Order of the Ashen Veil

Jumping back in time to the release of the daemon hunter codex in 2003 (gosh that's a long time ago😵), I said to my gaming group I will start a sororitas force the day GW made them in plastic.

And to be honest, I kinda lost hope it would happen one day, until 2 years ago following the first massive survey they ran and so many people ask for the release of plastic sisters.

Two years is a long time to keep your motivation and interested, I went back and forth on them not knowing if I really wanted to start a new army after painting my primaris. 
But in the end the miniatures where so nice and so much to my liking, I couldn't help myself. 

Not everything is perfect, but after the very flat primaris, I happy to return to something that is much more 40k for me, much more grim dark.

After this decision, I had to debate with myself, whether to go for one of the main order or to do something different. I really loved the bloody rose but I didn't want to paint another red army. 

I decided to challenge myself to try something new and different from my usual painting. 
I choose a yellowish bone armour, with a bright dark blue to contrast, the colours are opposite on the colour wheel.
Since the armour has a yellow tint, I choose to do the metallic in old cooper to have different tone,

Following my brainstorming, I quickly went to work on a test subject.


For the base, I tried to represent a luxurious planet similar to catachan or naboo with the ruin of ancient temple where the sororitas are sent to bring the population to the imperium.
I know a few of people aren't convinced with them, but the universe is vast 😜

Next I started working on my first squad, so many details and a few more textures and colours to decide. And learning how to do marble, since I haven't done any marble in like 15 years.


I'm really like the look of the squad, though in the end, I choose not to do the order symbol at the bottom of the cloak and corrected my test model.

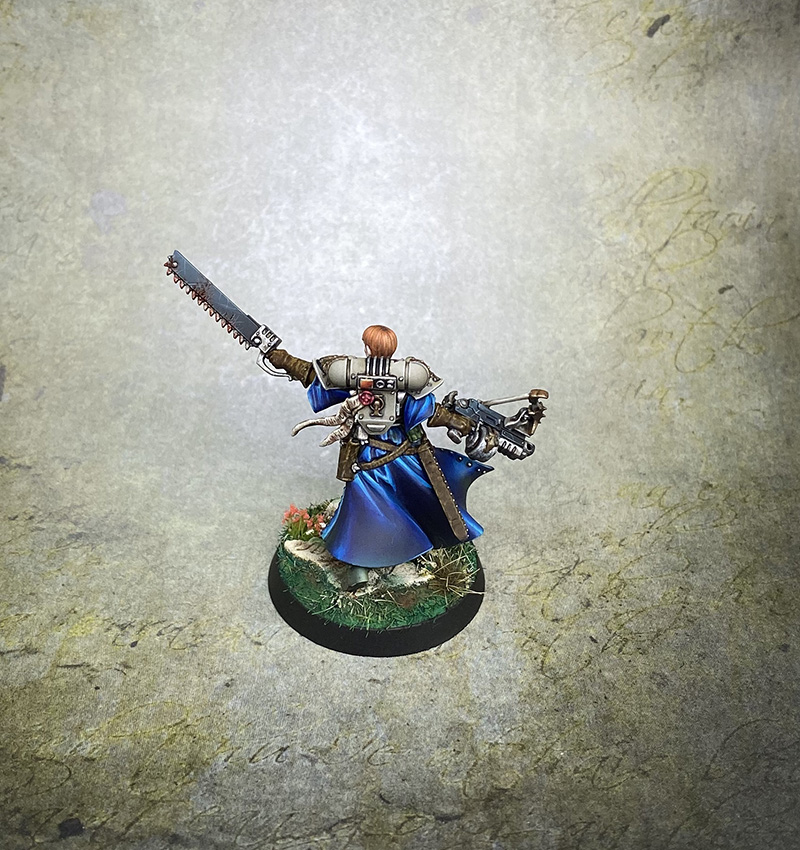
I needed a HQ and what better hq than the canoness, the original and only sororitas leader !
I made a small modification to the miniature since I wasn't a fan of the original head, I used one of the sequitors head from AoS instead.

Let me present you Canoness Georgina in all her glory


Since I've got the army box and received a few kit for my birthday, may more are coming but those miniatures takes times so, you'll have to be patient to see the rest 😝
As a small teaser, I'm working on this bad boy now...
I will take picture for the next marble I do, since I've been overwhelmed by the return I had on this one 😅 

Until next time
Anamnesis

28 May 2020

What's new and general hobby update

Hello dear readers!

It's been some times since the last post; a general lack of reel motivation to paint or write, problem with taking proper picture for tutorials and the corona quarantine mean this blog has been mostly left to collect dust. like really it's been 3 month

But on the bright side, there is still a constant flow of people checking the blog for whatever reason. I find it fascinating and a good sign, so thank you everyone!

Since I'm really late on my update, here is everything I've been working on since February (wow that was a long time ago...).

One of the biggest project I've ever worked on for fantasy is the Tauralon from the stormcast

I really like fantasy beast in general and since I need a lord arcanum for my sacrosanct chamber, this was the perfect excuse to have a big centrepiece.
Though in game, it's not the same as is rule are a bit lackluster but it's alright.


I wanted something really colourful, but not garish. I had no real idea what I wanted to do so I was mostly choosing colours I liked and find a way to make it works together.
In the end, I'm happy with the result even if a few things could have been better.
My photobooth was too small for this model so I had to resort to other mean, in this case, a simple black t-shirt as a backdrop.

On the conversion side, it's a mix of the two rider found in the box with the head from the sequitor, I added a collar made from aventis head and that's it mostly. A simple conversion to make this model mine :)

Second unit complete!


I finally finished the liberators I started in January, that's where I realised the armour takes a lot of time, but again really moody result.
This mean I now have the basic 1 hero, 2 troops to play age of sigmar, hooray !

The next unit for this army will be the dracothian guard because I really love them.
Here is a small sample


Still in the age of sigmar setting, I've tried Warcry for the first time this week-end and honestly that was a blast and probably the best games I had in a long time !


I challenged myself to paint my warband for the first game, so I had one week to do it. Of course I failed.
They took me 10 days since I've been much busier than expected but it was a fun experiment. Proving also that I'm unable to do speed painting


No conversion this time, but I tried the metallic base and ink on top combo. I do love the result !
Everyone of them has a different skin tones by the way, fun experiment.

But my first love since they have been revealed are the unmade, so as a reward for successfully completing my certification and finishing my first warband, they are coming next week!

I'll keep my new sister of battle for the next article ;-)

Thank you for reading thus far and until next time!
Anamnesis

27 Feb 2020

[Review] Krycell Precision Ice and snow - ultra snow product

FULL DISCLOSURE - I didn't pay for this product, Krycell sent me two bags of ultra snow to review it, following my first review from 2018. Now you know everything.

Flash news, this article was supposed to be published at the beginning of the month, but as I was properly blessed by father nurgle and I was sick in bed for more or less two weeks so my schedule has been put to rest, much like me. Allergies season doesn't help either.

Seriously, I haven't been this sick in a long time
Alright, it's no secret that I really like snow base, particularly on dark miniature, it makes them pop, I look shiny and it’s always fun to do. 

So, when Krycell send my new a little bag of their new snow to review it, I couldn’t refuse! You can find my first review on their product here.

Let’s start with the basics and the product description:

The ultra snow is supposed to be functional for all scales, compared to the fine and extra one which are more oriented towards specific scales.
The presentation show it used with silicon to make a past which can be washed and put in place after curing, you can easily make trace in the snow. I let you the judge of the result but personally I think it looks great! You can clearly see the glitter of the all the little fragment on the video.

Here is the link of the presentation video to have a look by yourselves

Bag in hand, I wanted to experiment a bit with this product and what you can do with it.
To be honest, I had no silicon and was too lazy and sick to go buy some. Not a problem since I have quite a selection of products to make a few tests. Also, you can see the result in much better quality in the video.
Though, Krycell is working on an adhesive to replace silicon and it should be available soon.

Here is what I used: pva glue, uhu glue, water effect gel and krycell adhesive and some fine snow, more on that later.

Following this, a few pictures of this experiment

First quick test on a plastic pot, it’s black to have a better view of the transparent properties

Anamnesis studio
  1. Ultra snow mixed with water effect, it looks a bit brittle and it’s not really sticky, I wouldn’t not recommend this one
  2. Mixed with our trusted pva, the effect is interesting and easy to use, the bond is strong, and nothing move or rub off
  3. Same as the second but I sprinkled some ultra snow on top, it gives a fresh snow look
More test on a plastic base painted black.
Anamnesis studio
  1. Snow with uhu glue, work quite well but in this case very sticky, strong bond, quite transparent 
  2. Same but with a light sprinkle of snow powder on top, I also made an imprint in the snow with a boot, not the best since it’s sticky and the glue tend to level the mix
  3. Second test with pva and snow, second imprint test with the same boot, also hard because of the stickiness but it holds the print quite well
  4. Still pva but with a sprinkle of powder on top, the imprint is easier this time and the shape hold well, bond is strong
  5. Using the krycell adhesive mixed with the snow powder this time, work well and look more natural, though the bond is weaker, and the powder can rub off, but you can circumvent this with a coat of varnish at the end though
  6. Same as before but with a sprinkle on top again, the imprint work well and hold the shape, bond is the same as before, I recommend varnishing though
  7. Now, this one is a bit different I mixed krycell adhesive with the ultra snow and added a bit of fine snow. That’s probably my favourite result of the bunch and the one I used on my stormcast; you can see the result at the end
  8. Same mix of ultra and fine snow but with pva glue, similar result but I prefer the krycell adhesive for this one.
Anamnesis studio
Bonus pic, my mix of ultra and fine in the mixing cup, looks like a fresh avalanche, the reflection is beautiful and looks so realistic, the particles are shiny and react like a little diamond when you move the light around.

A proper example on my latest stormcast in her happy snow tundra using mix 7
Anamnesis studio

And this is the end of my review! As Krycell has been generous when they sent me 2 bags, I will be giving the second away on my Instagram with the instruction booklet so one of you can enjoy this fun product! This should last one week till the 5th March 2020.

You can find Krycell product on their website: www.precisioniceandsnow.com

Thanks to them for giving me the chance to review this product!

Until next time,

Anamnesis

24 Jan 2020

[Tutorial] True metallic weapon

ANGLAIS - FRANCAIS


Hello again dear people !

It took some times to have all the picture needed but the tutorial for true metallic is finally here! 
De retour pour un nouvel article, on continue dans la série des tutos ceux-ci étant les articles les plus apprécier !

Here a result of this technique applied to the gold and silver.
Voici une idée du résultat de cette technique appliqué ici sur l'or et l'argent.

Anamnesis studio

I know NMM is all the rage now, but I do find a good metallic can be even more challenging due to the way the metallic pigments act. On the other hand, it’s basically NMM with metallic paint so…
Again this is just one way of doing it, with a very strong contrast, feel free to try new colour for fun effect or to dilute the ink if you want a lighter transition. 
Je sais qu'en ce moment la tendance est plutôt au NMM, mais je me suis gentiment rendu compte qu’un joli « vrai » métallique peut être tout aussi difficile à rendre correctement, en partie à cause de la nature ces pigments métalliques et le rendu sur une table de jeu est également super sympa.
Encore une fois ce n’est qu’une proposition de rendu avec un contraste très fort, n’hésitez pas à expérimenter ou changer les couleurs, voir à diluer l’encre pour une résultat plus doux.

Without more ramble let’s dig in! 
Fini le baratin, rentrons dans le vif du sujet !

Paints used:

Anamnesis studio
  • S75 Heavy metal
  • S75 Speed metal
  • S75 White Alchemy
  • Daler & Rowney Marine blue ink
  • Daler & Rowney Black ink

Anamnesis studio
Basecoat everything with heavy metal mixed with a point of blue and black ink, you want a slight blue tint desaturated with the black but not as dark as black metal. 
Ma couche de base est un mélange d’heavy metal avec une pointe d’encre bleu et encore moins de noir, l’idée est d’avoir une base teintée mais légèrement désaturé avec le noir mais pas aussi sombre que le black métal.

Anamnesis studio
Now blend pure heavy metal toward you light point, to give you an idea where to put your light points, I try to have the upper part dark and lighten the bottom part since the edge highlight will create a strong contrast and interested.
Another way to find where to put your light is to just put your mini under a direct light and observe where the light panel receive more light. 
On commence le travail de dégradé avec du heavy metal pure, l’idée de faire une transition en douceur vers notre point de lumière. En général, je garde mon point supérieur sombre pour créer un contraste avec les arêtes éclaircis, je tire donc ma peinture vers le bas.
Un autre moyen de définir ou poser ces lumières est de simplement mettre votre figurine sous une lampe et d’observer les zones qui reçoivent cette lumière.


Anamnesis studio
Continue blending with speed metal covering a smaller part than last step. 
Je recommence à éclaircir avec du speed metal cette fois en travaillant sur une zone plus petite que la précédente.

Anamnesis studio
Time for shading now, using pure marine blue ink, I put a dot in my deepest corner and blend on the go using the loaded brush technique. If you don’t feel comfortable using this technique, just paint the corner with ink and with a clean brush, blend the transition between the ink and the metal.
The ink takes a bit more time to dry, you should have time to work it out, just remember to leave some of the base tone visible. 
C’est le moment de commencer à travailler les ombres, je prends une pointe d’encre bleu que je dégrade dans le frais en utilisant la technique du loaded brush pour plus de rapidité (et aussi parce que je suis fainéant). Pour ceux qui ne se sente pas à l’aise avec cette technique, il est possible de peindre le coin choisi avec de l’encre et pendant que la peinture est encore fraîche, venir assouplir la transition avec un pinceau humide avec de créer le dégradé, l’encre prenant un peu plus de temps à sécher que la peinture acrylique.
N’oublier pas de laisser apparaitre une partie de la couche de base pour avoir une jolie transition.


Anamnesis studio
Shade the darkest corner using black ink, I am again using the loaded brush to do it quicker but, another easy way to do it is to dampen the part you want darker and add a tiny bit of ink in the corner, the ink should blend itself with the water on the support to give you a quick and easy blend. 
Je recommence mon loaded brush avec de l’encre noir dans le coin le plus sombre de ma zone. Une façon de traiter cette étape est d’humidifier la zone de peinture et de venir mettre une pointe d’encre sur le coin choisi, si cela se diffuse trop, il est possible de venir adoucir la transition avec un pinceau légèrement humide.

Anamnesis studio
Using white alchemy, I pick up all the edge to give more definition to the shape of the weapon
Je fini mon arme en venant éclaircir toutes les arêtes avec du white alchemy pour venir marquer mes volumes.

Anamnesis studio
Bonus step: even on true metallic, I really like adding a few scratches to make it more interesting, in this case, I make marks with black paint (and not black ink, you want to cover the metal pigment) and just underline it with white alchemy. 
Etape bonus : même sur les peintures métalliques, j’adore ajouter des éraflures pour rendre la peinture un peu plus « vivante ». Dans ce cas, j’utilise de la peinture noire (et non pas de l’encre, le but étant d’avoir une éraflure matte qui recouvre les pigments brillants) pour réaliser les marques que je viens souligner avec du white alchemy toujours en allant un peu plus loin que ma marque noire.

There you go! Enjoy and let me know if you like this technique on Twitter or Instagram !
Et voilà le résultat, n’hésitez pas à me faire vos retours sur cette technique sur Instagram ou Twitter

Until next time,

Anamnesis

15 Jan 2020

2019 Restrospective

Happy new year, dear readers!

2019 has been a busy year in all aspect of my life, quite a few things happened but as a result, this blog has received less update than expected.

A few events from last year, in no particular order:
  • got married
  • had my bachelor party, and someone tried to steal my phone
  • fully organise a beautiful honeymoon in Iceland
  • turned 30
  • had the pleasure to see Marc Masclan epic version of Archaon in Barcelona
  • started a new certification for work
  • applied for a new job, and learned that I didn’t get it
  • painted the biggest model I ever owned
  • took part in Everchosen competition and finished in the top 100, I now really hate this miniature because I had to rush the end but everyone seem to really like on social media #awkward
  • painted Abaddon as a gift for my best man
  • Not a bad list...
Anamnesis studio
Captain Badass
We’ve been preparing this wedding for 2 years, so 2020 we’ll be a slow year after all the thing we had to do in 2018-19. Which also mean, I should have a bit more time to write articles hopefully, as I’m a bit behind what I had expected to write this year.

2019 in number on the blog:
  • 15 articles, the most viewed ones are always the tutorial, no surprise there
  • 18 comments
  • 82’000 lifetime pageviews
  • 17 followers
  • And between 50 and 80 visits every day, which is a surprise considering the number of articles
Anamnesis studio
Most viewed article 
Anyway, I just wanted to thank you for checking this blog more regularly than I do!
Anamnesis studio
This thing is heavy on every level

If we look at what I painted this year, here is the tally!
  • 1 Astraeus super heavy tank
  • 5 Primaris reivers
  • 3 Interceptor
  • 1 Primaris Librarian
  • 1 Redemptor dreadnought
  • 1 Sylvaneth Branchwych
  • 10 Dryads
  • 5 Tree revenants
  • 1 Arch revenant
  • 1 Kit of enduring storm vault
  • 1 Abaddon
  • And 5 stormcast sequitors
Which is a total of 35 miniatures and scenery, which is not too shabby if I may say so myself 😊
This kit is fantastic
I did learn a lot during this year from many points of view and I hope to bring it to the light next year.
There are a few articles which I know you’re waiting for, I should be able to write them soon-ish if everything goes.
Anamnesis studio
Hello, new project...
Anyway, thank you everyone for your support and I wish you all the best for 2020!

Anamnesis