26 Sept 2018

[Review] Krycell snow products

So the weather went from burning sun and paint drying on the palette to an icy wind and 20° drop in temperature, what better time to talk about snow !

Bon avec le temps passant de la sécheresse totale où la peinture sèche sur la palette, au froid mordant avec un delta de température de 20° en l'espace de deux jours, quels meilleurs moment pour parler de neige!

I had a few frustrating trial and errors relation with snow base in general, because I couldn't find something satisfying my expectation, in no particular order, I've tried baking soda, sugar, flour, woodland scenic snowflakes, then I tried Krycell snow powder.
(As a funny note, I was quite wary of received white powder by mail, but everything went fine!)

J'ai testé pas mal de produits pour faire des effets de neige, mais je n'ai jamais vraiment réussi à avoir un résultat qui me satisfaisant. Pour info, j'ai testé le bicarbonate, du sucre, de la farine et les flocons de neige woodland scenics, pour finir par tomber sur la neige Krycell, la révélation de l'année !
(Note amusante, j'étais un peu sceptique sur le fait de commander de la poudre blanche par la poste..)


As a disclaimer and to be clear, I'm not sponsored by Krycell, I just find their product really good and wanted to share, sharing is caring ! 

Also, it is the first review article, stay with me I'm new to this!

Pour être transparent, je ne suis pas sponsorisé par Krycell pour leur faire de la pub, j'ai payé ces produits et je vous fais part de mon expérience personnelle sur ma commande pour la communauté!

Il s'agit de mon premier article retour d'expérience, dites-moi si ça vous intéresse en commentaire!

A few different offers are on the website, snow powders, ice sheets, water effect, but I'll stay on the snow subject since I haven't tested the rest (yet).
The snow has 3 different kits, I went with the basing kit mostly because I wanted to try the insta-sno.
There is another kit with a sieve, but I wasn't sure I would use it, so no sieve review, sorry people.

Vous trouverez plusieurs choses en vente sur le site, de la neige, des feuilles de glace, de l'eau artificielle, je resterai sur le sujet de la neige n'ayant pas eu l'occasion de tester les autres produits pour le moment.
J'ai donc choisi le "basing kit" avec de la neige fine, principalement car je ne pensais pas utilisé tamis avec le kit complet et je voulais tester l'insta-sno. (A posteriori, j'aurais bien pris le tamis, mais passons)

Basing kit from Krycell website
So the basing kit (fine pack) include - Ce que contient le kit:
  • 50ml snow wash 
  • 60g insta-sno
  • 115g of snow powder / poudre de neige
  • 100ml of adhesive /colle
  • a little booklet with instruction / un livret d'instruction
The booklet gives you an idea on how to use the different products in the box, with nice little picture and everything (There is apparently a new booklet being printed, if you refer to the website). It's well made, and you can find more information on the official website.
To give you more insight, here is a picture the summary.

Le livret vous donne des idées sur l'utilisation des différents produits contenu dans la boite accompagné de photos et d'instructions très claire. Le livre est plutôt bien fait et vous avez la possibilité d'avoir plus d'information sur le site directement (j'ai d'ailleurs constaté qu'un nouveau livret est en cours d'impression, je n'en sais pas plus sur le sujet).
Pour vous donner une idée, voici une photo du sommaire.

The powder is, well, powder. It look like fine flour so don't sneeze in the bag or you'll have powder everywhere.

La poudre de neige en elle-même, on dirait de la farine très fine, faites donc attention à ne pas éternuer dans le sac vous retrouverez de la poudre partout.

The use with the powder you have a nifty bottle of adhesive which can be applied with airbrush or a brush, or just mix it with the powder that's what I do, more on that latter.

De la colle est fourni avec le kit, celui-ci à la particularité de pouvoir être utilisé avec un pinceau ou un aérographe, voir même de le mélanger directement avec la poudre (c'est d'ailleurs ce que je fais pour mes nighthaunts)

The snow wash is basically white powder with some medium, it is acting like any other wash and add some nice effect in the recess.
Krycell is very generous with the bottle it's full up to the cap, the fluid separate and it's quite hard to shake it really well at first, but after a few uses, i'll be easier.

Le snow wash est un wash similaire à ceux de gw, il va se répartir dans les creux et laisser de la neige dans les recoins principalement. Krycell est particulièrement généreux sur cette bouteille, elle est vraiment remplie jusqu'au bouchon. Cependant, le produit se sépare et le secouer avec le flacon aussi plein est difficile, il faut vraiment bien le secouer pour avoir l'effet attendu.

And finally, you have a little pot of insta-sno which is ready to apply snow, like a real snow mantle it's slightly transparent, you can leave to dry for a few minutes and press the feet of your miniature to make some trace in the fresh snow.

Et pour finir, il y a un petit pot d'insta-sno qui est une neige prête à l'emploi, relativement facile à mettre en place, elle est légèrement transparente et si vous laissez sécher pendant quelques minutes vous pouvez facilement faire des traces de pied ou similaire comme dans une neige fraîche.
Using some of the technique in the booklet, I tried a few different way to use these products, a little picture of the result:
En suivi les instruction du livret, j'ai fait différents tests sur les produits fournis et la façon de les appliquer, voici donc le résultat de mes expérimentations:

1. It's simply the snow wash applied on a black undercoat, you can clearly see how it fill the gap and the ring around the edge of the pool. I find this effect very good for representing some light fresh snow.
Simple test du snow wash sur une sous-couche noir, on constate que le wash marque bien les creux et faire une petite auréole sur la limite des flaques. J'aime beaucoup cet effet pour une neige légère.

2. The second is a mix of powder and adhesive, with a bit of blue ink to see how it react with other paint. The result is akin to melted snow, I have exaggerated the blue to make it more apparent in the picture.
Le deuxième est un mélange de poudre de neige et de la colle fournie avec un peu d'encre bleu pour la teinter et voir la réaction avec de la peinture. Le résultat est similaire à de la neige fondue, noté que l'encre a volontairement été forcée pour que l'effet soit plus visible.

3. Now it's just powder and adhesive, that's the melted snow or heavy snow you can see on my nighthaunt miniature. (Check last week article if you want more pictures)
La même chose mais sans encre, un joli effet de neige fondue ou épaisse selon le mode d'application, c'est d'ailleurs ce que j'utilise sur mes nighthaunts visible dans l'article de la semaine passée.
4. The adhesive was brushed on the surface then I sprinkle powder with my finger, not a big fan of the result, but can be of use.
Un test avec la colle appliqué au pinceau sur la surface et la poudre parsemé avec les doigts au-dessus, le résultat n'est pas forcement folichon.

5. I use my mix from the third try and sprinkle some powder using an ice sugar sieve, which is nowhere fine enough for this, but that should give you an idea.
J'utilise mon mix sans encre et je tamise de la neige dessus avec un tamis à sucre glace, ce n'est pas assez fin mais ça permet de se donner une idée du résultat.

6. It's the famous insta-sno, you can almost sculpt this one and it's ready to use, which is a big plus. But the pot may be small if you want to base an entire army.
Le fameux insta-sno, c'est un peu plus pâteux que mon mélange mais c'est intéressant et si vous le laissez sécher un peu, il est possible de lui sculpter légèrement. A noter que le pot est petit si vous prévoyez de faire une armée entière.

7. This is my second take on using adhesive with a brush and sprinkling with my sugar sieve on a larger surface.
Deuxième essai avec la colle au pinceau et la neige tamisée avec le tamis cette fois.

8. Using my mix with blue ink, I sprinkle some powder on top, which can give you a little more depth to your snow and can represent a nice iceberg underneath the fresh snow.
Je réutilise mon mélange avec de l'encre bleu et je tamise de la poudre dessus pour tester le résultat.

Here is the result of snow wash on a textured base, the snow is nicely distributed in the different recess around gravel and sand. 
Voici la photo du snow wash sur un socle texturé, la neige se distribue bien autour des graviers et du sable.

And here is the melted snow effect I'm using on my nighthaunt, I added some blood stain dripping from the weapon.
Keep in the mind the snow powder is really like a powder and it will absorb the paint, so don't thin it too much or you'll end up with a big stain on the snow.

Et voici l'effet de neige épaisse un peu fondue que j'utilise sur mon armée, j'ai également ajouté des tâches de sang pour le fun.
Attention sur l'application de peinture ou de sang sur la neige, celle-ci absorbe bien la peinture donc ne la diluer pas trop sous peine de se retrouver avec une tâche beaucoup plus grosse que prévu.

You can seal it with matt varnish, but since I'm already mixing with the adhesive I've found the mixture strong enough to withstand my use !

Vous pouvez vernir la neige avec du vernis matte, mais je n'ai pas trouvé ceci nécessaire quand la poudre est directement mélanger avec la colle.

I really find this the best product I've used to represent snow effect, it's easy to apply, hold well and most of all, it is really realistic!
If you interested in snow base have a look at their offer on the website, don't hesitate to ask them if you have question, the staff is eager to help and quick to answer!

Je suis vraiment très satisfait de ces produits pour les effets de neige, c'est facile à appliquer (et à nettoyer d'ailleurs), ça tiens bien et c'est très réaliste.
Si vous souhaitez faire des socles enneigés, je ne peux que recommander d'aller jeter un œil sur le site de Krycell ! 

Krycell website: www.precisioniceandsnow.com

I know some of you are waiting on the full tutorial for the icy/snowy base, it's not ready yet but should be on the blog next week Nagash willing or the week after at the latest!

Je sais que certain sont en attente du tutoriel sur mes socles enneigés, il n'est pas tout à fait prêt mais l'article devrait être publié la semaine prochaine ou la suivante au plus tard!
Le site a été retravaillé également, donner moi votre avis en commentaires!
If you enjoyed this review or the new theme of the blog, let me know in comment! 

Cheers
Anamnesis

17 Sept 2018

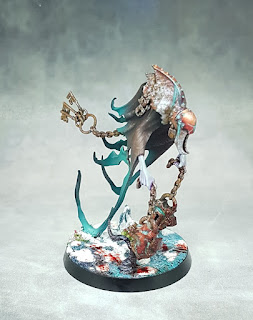
Project Soul Wars - The Nighthaunt


Quick update with last week article, I entered my shadespire team on the eadbanger online competition on eavier metal Facebook group and came second in the squad caterogy, yeay! 

Petite update sur l’article de la semaine passée, j’avais entré ma team shadespire sur le concours de peinture annuelle du groupe Facebook eavier metal et je suis ravi d’avoir fini 2ème dans la catégorie escouade 😊

Now, I’ve been having a hard time keeping up with all the new stuff coming from games workshop, so many amazing miniature and so little time to paint them!

But I caved in with a friend when soul wars came out, I never played age of Sigmar, but I was quite intrigued by the new rule and to be honest I like melee and since 40k look more like a shooting game, it was a good excuse to try it out!

We’ve played a grand total of 3 games only but we found it much more appealing than 40k (which is a shame cause the setting is amazing), and so I ended up with the nighthaunt since my mate had some stormcast already.

Being push fit meant we could play really quickly, though I must admit I still misses the old plastic kit with many different options, nowadays the quality and dynamism are much better, but you tend to be stuck with only on way to build them.

Aside from that, the minis are incredible, full of details and… wobbly.

Having only on little piece of ghostly thingy glue to the base mean some of them look more like a bobble head than a mini, looking at you lord executioner.

Full of motivation for them, I wanted to do something different from all the ghostly minis I saw popping online.

Here is the result, one thing was sure, I wanted to do snowy base with ice, basically because I tried it on a test base and the result was pretty cool, which is reason enough in my book!
I’m planning a full review on the snow stuff I’m using, cause I really think what they have at “krycell precision ice and snow” is really incredible and they deserve an article!

J’ai eu beaucoup de peine à suivre le rythme des sorties GW, beaucoup de belles choses, beaucoup d’envie compulsive où j’ai résisté dans la majeure partie jusqu’à la sortie de Soul wars.
Ces nouveaux artworks plus sombre et revenant sur un style un peu fin des temps (pour ceux qui ont suivi) m’ont beaucoup tenté, mon camarade de jeu ayant un œil sur AoS depuis un petit moment on s’est laissé tenter.

Je dirais en ouverture que je n’ai eu que très peu d’intérêt pour AoS après la fin de battle que j’aimais beaucoup, les règles étranges du début et l’insertion des space marines stormcast de façon un peu sommaire à contrario du riche univers précédent m’ont un peu refroidi. Puis petit à petit, la façon de traiter le background a changé et j’ai été tenter la 1ère fois par la sortie des kharadrons mais retenu par une impression de règle enfantine, la v2 ainsi qu’un certain changement vis-à-vis de nos attentes de jeux ont fini par avoir raison de retenu.

La boite entière est en push-fit ce qui est très sympathique pour jouer rapidement, mais implique d’avoir un certain nombre de doublon. Bien que les nouvelles figurines soient incroyables dynamisme, je déplore un tantinet la perte de kit modulaire de l’époque, particulièrement visible dans le cas des nighthaunt, ou il n’y a qu’une seule façon de les monter, qui est donc mon choix sur cette boite de départ.

Un point à prendre en compte, le design fantastique de ces fantômes volants implique qu’ils ne tiennent sur leurs socles que part un petit bout fantomatique (dans tous les sens du terme), c’est donc relativement fragile et je dois bien avouer que je suis encore en train de me demander comment je fais déplacer tout ça. Ah et ça bouge pas mal, je pense typiquement au lord executioner…

En dehors de ces petits détails, je me suis lancé sur ces figs pleins de motivation pour trouver un schéma qui sorte un peu de l’ordinaire, ayant vu un nombre grandissant de schéma fantomatique sur la toile, je souhaitais avoir un mix entre fantomatique et physique tout en ayant un truc relativement simple.
Le choix du socle a été fait avant de compléter le schéma des figurines car je voulais réaliser des socles enneigés après un test particulièrement concluant ! Je profiterai de faire un article complet pour faire une review des produits « krycell precision ice and snow » que je trouve vraiment fantastique !

Le constat est qu’apparemment je n’arrive pas à faire quelque chose de simple, mais c’est un détail.

Voici donc le résultat de mes pérégrinations fantomatiques !

The first victim, M. Spirit torment


Age of Sigmar Soul Wars

Age of Sigmar Soul Wars


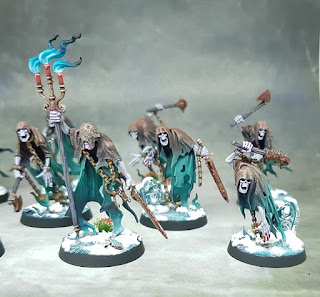
Following in his wake is a first group of 10 chainrasp, there are so tiny! specially after painting primaris and stormcast.

Dans la continuité du Spirit torment, j’ai enchainé sur une escouade de 10 chainrasp, ils sont tellement petit comparés aux dernières figurines (c’était également la 1ère fois que je peignais 10 figurines en même temps, c’est… particulier diront-nous). 


Age of Sigmar Soul Wars

I had a few people asking for the scheme, so some tutorials will be coming, the first one will be on the base followed by the rusted weapon or vice versa 😊

J’ai eu plusieurs personnes qui m’ont demandé les recettes, je suis donc en train de prendre des photos sur les prochaines réalisations pour vous préparer de jolie tuto (pas encore en vidéo désolé de la déception héhé), les deux premiers seront sur les armes rouillées et sur les socles enneigés !

I’ll present the lord executioner and his fellow wizard in another article!

Je profiterais du prochain article pour montrer le lord executioner et son pote Gandalf (en version transparent) dans un prochain article !

Cheers!

Anamnesis

10 Sept 2018

Shadespire Severin steelheart warband

I never presented the full warband for Warhammer underworld after the tutorials, let's correct this! 

You can find full step by step on the painting process in my previous articles:

I’ve been hooked by Shadespire, it’s pretty new, small and easy to play but hard to master, I’ve played more shadespire than 40k and AoS in the last year, soooo easy to set up it’s a joy! 

Since the numbers of bands is limited, I wanted to convert my team to be able to recognise them at first sight. The models are push fit, but it doesn’t mean you can’t convert them. Cutting the little tab is an easy way to move bits around just like changing a weapon.

A small number of model also mean I can try to push my painting since it’s “just” 3 miniatures, little I knew it would take me 3 months to finish this project! 


I decided to paint them using non-metallic metal, I really like this technique, but I can’t see myself using it on a full-scale army, so a team of 3 members is the perfect opportunity to try it! 

My first victim was Oberyn, I quite like the miniature with his stern look, the giant hammer is carrying around mean he’s not joking around. To emphasize this effect, I choose to cut the parchment flying from the head of the weapon and made him look in the same direction as the head of the hammer and slowly down to give him the expression of a monster ready to smash the vermin crawling at his feet. 

I choose the colour to keep in line with the blue-green atmosphere you find in almost every artwork of Shadespire, which are mostly cold colours and give this impression of a depressing environment (A accurate description of this city), but to give it more interest and contrast I painted a strong copper and applied some orange rust to break the armour panels. 
Warhammer Underworld Shadespire
Excuse the white font, I forgot to take a pic on the black one
All the recess of the blue armour has been glazed with a deep red to give a deeper contrast, I tried to apply different kind of textures on the materials, the leather and clothes use the stippling method as opposed to the smooth blending of the armour to help differentiate them.

The weapon were painted jade to make them look like the shadeglass weapon on the cards.Every part has been weathered to represent the rigour of battle, with scratches and tears. A simple black line underlined with your highlight colour will do the trick (you can find more details in part 2 of my tutorial). 

The miniatures are quite dark, I choose to paint the pavement in a lighter tone to make the miniature stand out on a white stone floor, I used a sponge to paint all the stone and applied a few glazes of the different colours found on the mini to link them together. The leaves are crimson red to represent the flora responding to the blood spilled in everyday battle around the city.

I choose to replace completely the second member, I find Angharad a bit bland and I was already looking for an excuse to paint Neave Blacktalon. Using her as a base, I cut the arm to reposition the axe and use the original shield on the front hand, the spikes on the collar have been also cut out to make her less ornamented, but I’ve kept the original base, I just had to plug the front hole since I’m not using it.

Warhammer Underworld Shadespire
Many shot for my favorite mini of the team :p
Female faces are a very good exercise to be gentle with your contrast, I choose to give here red hair to contrast with the amour. One thing associated with red hair is freckles, I attempted to represent them on the face which was quite a challenge at that scale. 
A little blue make-up to finish her eyes and she was ready for action!

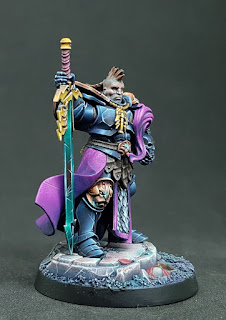
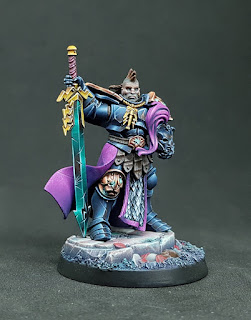
Two members being done, we’re left with the leader, Severin Steelheart himself. The first thing I’ve done was cutting the head off, I wanted a head a bit more savage looking, quite similar to a Viking like Neave. I’ve used a marauder horseman head with a mohawk and found it was enough to make him different (and it’s a bit more work to modify him). I’ve also painted him in sub-assemblies to facilitate the painting of the sword and cloak principally.

Warhammer Underworld Shadespire

The miniature has been painted in the same way as the previous ones with more cooper to make him stand out, the cloak was a fun exercise in stippling, spoiler it cost me one brush!
Quick tip, don’t use your best brush for stippling, it is quite hard on the brush’s hairs.

The flesh tone of his face is much darker than Angharad and you can clearly see the difference in contrast, I’ve used some desaturated brown to give this colder effect, a little stubble using some glaze of dark sea blue complete the rugged look.


The full team

Warhammer underworld Shadespire


Hope you enjoy this article and the blog, I'm happy to report we passed 10'000 visit and coming close to 15'000 !
Thank you very much for your interest and let me know if there is a subject you'd be interested in?

Anamnesis

31 Aug 2018

[Tutorial/Showcase] Primaris Aggressor - Red tutorial

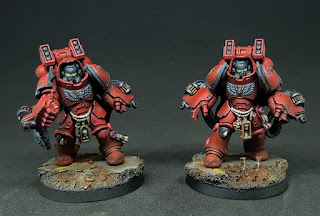
Following last week article, it's time to present my latest unit for my primaris army which clock them just under 1000points!

Doesn't seem much but I never add more than a squad and half painted for each army for many years, so it's quite a milestone for me :)

A few pointers concerning the kit, it's possible to build them almost completely and keep the head separate for ease of painting, you just need to cut the little peg under the head, so you can tuck them in their little hood.

Keep the ammunition feed in two pieces was a mistake, glue both side and then glue them in, I didn't glue to backpack to make it easier to paint.

Apart from theses littles things, the kit is really nice with a few options, cleaning the mould line on all the cables was a massive pain though.

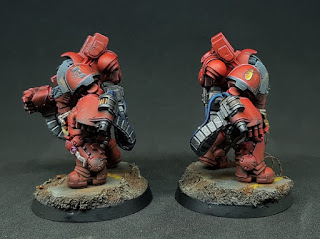
Without further ado, here is the result!

[Français] Et voilà, la finalisation de mes 1000pts de primaris (à 25pts près), la dernière escouade en date avec ces aggressors qui représente la garde rapprochée de mon capitaine et qui l'accompagne dans le repulsor. 

Jolie kit avec un certain nombres d'options; pour ceux qui se demandent, il est possible de monter l'ensemble de l'armure et de garder la tête à part, il suffit de couper le petit pivot sous la tête, il est possible de la glisser dans la zone réservée après peinture.
Évitez de garder les chaines de munitions en deux parties, c'est une erreur que j'ai fait ce qui a rendu le collage final plus qu'ennuyeux....

Knight of the Chalice aggressors squad


Space marines primaris aggressors

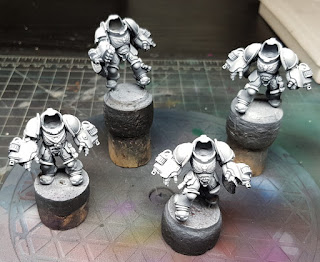
Before painting to give you an idea of the different parts, no heads, no backpacks.

Space marines primaris aggressors
Oh, if you're wondering why I have squad of 4, I had a pretty big miscast on my original box and gw was kind enough to send me a new one, kudos to them!

Red Tutorial - Tuto sur le rouge

Quite a few people asked me about my recipe for the red, when I choose my scheme, the idea was to have very simple steps to paint it so I could do a whole army this way. 
I put theses littles pictures together to show the process, I don't think the tutorial need to be as precise as the other ones since there's nothing much to it really.

Bon nombres de personnes m'ont demandés la recette pour le rouge, l'idée de base de cette armée était de pouvoir réaliser la couche de base à grande échelle et de façon rapide afin d'imaginer avoir une armée peinte un jour, voici donc un petit tuto rapide sur la façon de procéder pour avoir ce rouge bien flashy. (Pour être honnête, il a été fait avec les images à disposition, il n'est pas forcement aussi bien ficeler que les autres)

Space marines primaris aggressors
1. The first step and what I usually do with all my minis is prime them with chaos black, which is thus far the best basecoat spray for me. 
I will use preshading on this mini, this technique can be quite helpful to make the volume pop and give you a rough idea on where to put your highlight.
Give it a zenithal spray with white, to make it more interesting, I also spray with a 30° angle from the top, otherwise the legs will never receive any highlight from the white.

You can use a rattle can or an airbrush, all my intercessor where done using a rattle can and I used the airbrush for my lieutenant and captain, it's really up to you.

La 1ère étape consiste à sous-coucher la figurine en noir, j'utilise le spray gw qui reste pour moi la référence parmi les différents produits testés.

Pour ces figurines, j'utilise la technique du "preshading" (pré assombrissement pour les bons francophones mais ce n'est pas terrible comme termes...), cela consiste à sous-coucher une figurine en noir et appliquer un voile blanc en deuxième couche pour marquer les volumes.

Cette couche pour être appliqué au spray ou à l’aérographe à choix, le résultat à l'aéro sera un peu plus fin mais rien de transcendant non plus, pour référence, les intercessors sont fait à la bombe et les lieutenants et capitaine à l'aéro.
J'applique cette couche de façon zénithal en ajoutant un petit angle de maximum 30° pour donner plus d'intérêt et une meilleure lecture. Petit effet artistique, sinon la tête sera blanche et les jambes noires.

Space marines primaris aggressors
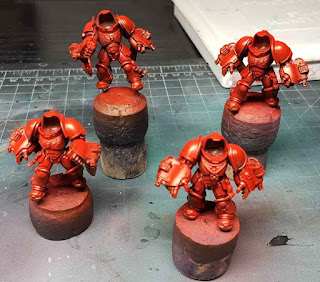
2. For the second step, I use an airbrush to spray the armour with daler & rowney flame red ink which is an acrylic ink. I don't even dilute it, to give you an idea of my laziness...
You just need to give it a few light coats to keep the transition you have between the black and white, the white undercoat will make the red pop. 

You don't need an airbrush for the step, it just faster to do it this way, if you want to do the same thing by hand, you need to do a few diluted coats to keep the original contrast.

Keep in mind that red is heavily dependent on the colour next to it, if you have really bright colours adjacent, it will make it less vibrant.
If everything went correctly, you should have a nice subtle gradient on the red. It's really shiny for the moment but the varnish at end will dull the effect.

La seconde étape, j'utilise l'aérographe pour faire de couches délicates de rouge avec de l'encre acrylique daler & rowner flame red ink, je suis tellement une flemme que je ne la dilue même pas...

L'idée est de faire plusieurs couches fines pour laisser apparaître les transitions et donner un effet de dégradé sans passer des heures à le faire manuellement.
L'aérographe n'est pas une nécessité mais il simplifie le procédé, si vous souhaitez le faire au pinceau, le plus simple est de faire de fines couches diluées jusqu'à atteindre la couleur voulue.

Il intéressant de garder en tête que le rouge est également dépendant des couleurs adjacentes, s'il est entouré de couleurs criardes, celui-ci va se "perdre" dans la masse, entouré de couleurs plus neutre, il va ressortir.
Le résultat est très brillant pour le moment, mais cet effet sera atténué par l'étape final de vernis.

Space marines primaris aggressors
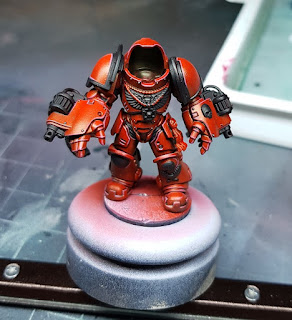
3. To make it easier to read, I painted all the black part in... black (badum); I also use a mix of red ink and black ink to mark all the joints and creases in the armour, the ink being more fluid make it easier to apply.
Easy step, just take your time to not make some marks on the red.

Pour faciliter la lecture et la peinture, je peins tous les parties qui seront noirs en... noir (tadaa); j'utilise un mélange d'encre rouge et d'encre noir pour marquer les creux et joints de l'armure, la fluidité de l'encre facilite cette application.
Prenez votre temps pour cette étape afin de ne pas dépasser sur les parties rouges.

Space marines primaris aggressors
4. Last step is to highlight the edges of the armour panels following the zenithal highlight, I am using a mix of 50/50 red ink and white, that part can be a bit tedious but It really make the armour pop.
Sometimes I do this step in two passes, adding more white and doing smaller line to finish it.
If the transition is to strong, just glaze some red ink to smooth it out.

And boom, flashy red is done!

Les dernières étapes consistent à éclaircir les arêtes de l'armure en suivant la lumière zénithale, j'utilise un mix de 50/50 encre rouge et blanc.
Je fais parfois cette étape en deux fois, si mon mélange est trop foncé, j'ajoute simplement un peu plus de blanc et reprend des éclaircissements plus fins. Si la transition est trop violente ou le mélange trop clair, je fais des petits glacis d'encre rouge pour affiner la transition. C'est probablement l'étape la plus longue, mais c'est celle qui va donner la définition de l'armure et ces contours.

Et voilà, un rouge bien flashy en 4 étapes !

Plusieurs articles sont prévus sur des tests de matos, des présentations (des nighthaunts!) et d'autres tutos, il faut juste que je trouve du temps pour les écrire, ceci me prenant un peu plus temps que ce que j'envisageais à la base. 
N'hésitez pas à me faire part de vos retours et de choses que vous souhaitez discuter !

I have quite a few things planned for the next few articles, showcase (expect to see some nighthaunts!), review and some tutorials, I just need to find the time to write everything, since theses articles take quite some time to write!

Cheers
Anamnesis

21 Aug 2018

Primaris Knight of the Chalice - Repulsor tank
It's been quite some times since the last article, I had planned to post it sooner but between life, being sick for few days, the heat and the release of battle for azeroth, I admit the hobby has been side tracked a bit.

Being level max and not much interest past the actual storylines mean I can go back to my miniatures!

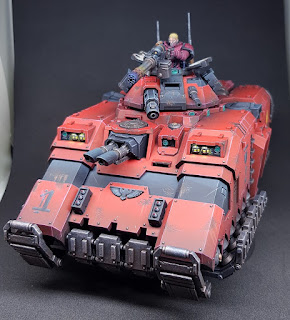
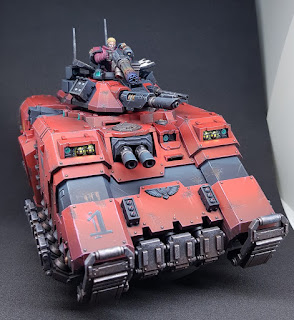
Repulsor - Pride of the second company, terror of the battlefield and personnal ride for Captain Beshop


The tank was finished a few weeks ago, but I never posted the picture here.
Let's correct this.

The mighty repulsor, also called "wait, where is my check list for the weapons"!

I wasn't totally convinced when this kit was released but I admit it grow on me.

I still made some minor converting, specificaly on the turret, which was too clustered for my taste.
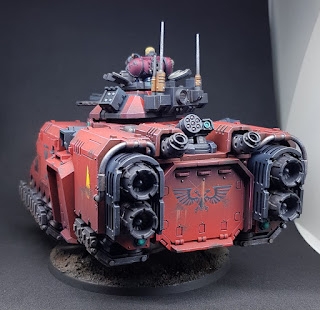
I put the rocket launcher on the front panel instead of the turret and cut the little peg to hold them, I'm no genious since I saw this modification on instagram, being honest...

A few fun effects were tested; on the gatling canon trying to represent the heat bloom, I used the new head from the blood angels primaris upgrade sprue also.
Big panels mean I had to add some shading on the red to make it pop, I use some purple ink to give it more depth.

Also special chapter mean no decals, so enjoy the freehand, the one on the back door was quite challenging to do :)

Space marines primaris repulsor
Close up on the pilot

You can also enjoy the fact that my lightbox is too small for this beast.

Next articles, I'll present my aggressor which ride on the repulsor with my captain, and normally a quick tutorial on the red!

Cheers,
Anamnesis